Skip to content

If you work with laser cutters, you’ve definitely had this exact stomach-drop moment:
You’ve been cutting dark fabrics all morning. Everything is smooth. High speeds, clean edges, zero issues. Life is good. Then a client calls and asks: "Can we do this exact batch in white?"
Your heart sinks.
Because you already know what's coming.
Maybe it's sublimation-printed sportswear — jerseys, leggings, tackle twill numbers — where the entire panel is white polyester that's already been heat-pressed. Maybe it's plain white cotton for uniforms or medical scrubs. Doesn't matter. The moment white fabric hits the bed, the edges turn a scorched toasted-yellow. You try white polyester, and a halo of ugly amber smoke stains spreads along the cut line. You drop the power — it won't cut through. You slow the speed down — it chars even worse. You flip the piece over, and there it is: a neat grid of dark burn spots on the back, like someone stamped it with a lit cigarette.
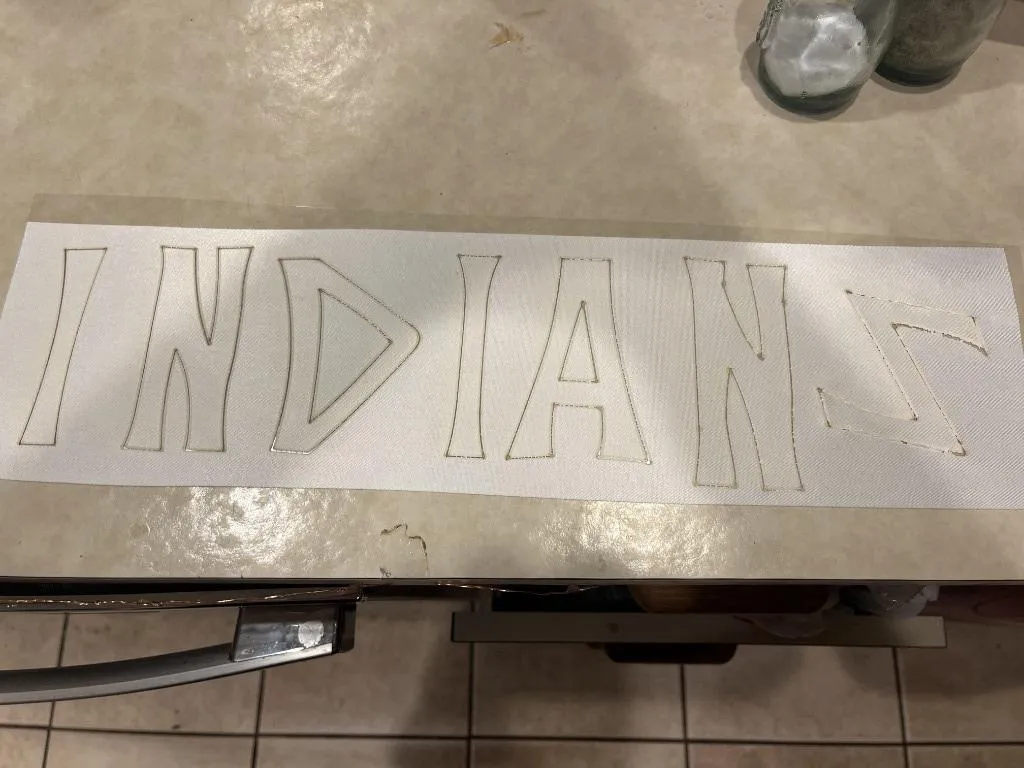
Figure 1: Typical amber-yellow scorch marks along the edges of 100% white polyester tackle twill due to resin vapor re-condensation and thermal degradation during CO₂ laser cutting. (Case source: Reddit r/lasercutting community)
(Quick note: "Tackle twill" is a weave pattern, not a fiber type. The polyester tackle twill used in sportswear lettering is a thermoplastic — it melts and seals under a laser. Cotton twill behaves completely differently. Always check fiber content, not just weave name.)
On dark materials, these flaws are invisible. But white fabric is an unforgiving lie detector. Every bit of thermal damage, smoke condensation, and oxidation is magnified a hundred times against that clean white backdrop.
This isn’t just an operator mistake—it’s physics.
I spent months digging through materials science, laser optics manuals, and burning through plenty of scrap material trying to understand what’s actually happening at the molecular level. Today, I want to share everything I’ve learned—no fluff, no gatekeeping.
It might not solve every edge case out there, but it will save you weeks of frustrating trial and error.
1. Understand the Physics: How Fabric Actually "Turns Yellow"
Many operators bundle "edge charring" and "yellow staining" into the same category. In reality, they are two completely different physical and chemical processes. If you mix them up, your parameter adjustments will head in the wrong direction.
Natural Fibers: They Don't Melt, They Burn
Cotton, linen, and silk are made of cellulose or natural proteins. They share one major complication: for all practical processing purposes, they do not melt.
Unlike plastics, natural fibers don't soften into a liquid state. When laser energy hits them, they undergo a continuous thermal decay chain: first dehydration, then molecular chain scission (thermal pyrolysis), which releases flammable volatile gases while the remaining fiber structure carbonizes into charcoal. If ambient oxygen is present, those volatile gases ignite into open micro-flames.
At the extreme power density of a CO₂ laser beam, this entire sequence happens in milliseconds. To the naked eye, it just looks like it "instantly burned."
CO₂ laser photon absorption (wavelength 10.6 μm) couples directly with the C-C and C-O vibrational modes of organic polymers. Once the laser energy exceeds the minimum threshold required to sever the fibers, any excess heat speeds up this pyrolysis chain. Combined with the 21% oxygen in ambient air acting as an accelerant, the cut line turns into a yellow-to-black carbon streak.
Worse yet, natural cotton has a porous, breathable structure. Capillary action sucks microscopic smoke particles straight into the surrounding weave, turning a light heat stain into a dirty yellow smudge.
The core strategy for natural fibers: Minimize excess heat input and suppress oxidative combustion.
Synthetic Fibers: Melting, Vaporizing, and Condensing
Polyester, nylon, and acrylic follow a completely different set of rules.
As thermoplastics, they have distinct melting points. The laser beam melts the polymer, vaporizes it, and severs the material. As a bonus, this process creates a clean, heat-sealed edge that naturally prevents fraying.
(A quick note on spandex: Elastane has a much more complex thermal response and decomposes rather than cleanly melting. If your fabric contains spandex blends, treat it with extra care.)
The real problem lies in the vaporization phase.
When a high-power laser vaporizes synthetic polymers, it generates a dense cloud of hot resin vapors and hydrocarbon smoke. If your exhaust system isn't clearing this vapor fast enough, the airborne hot resin cools down and re-condenses onto the surrounding cooler fabric.
These re-condensed resin deposits—having already undergone partial oxidation and thermal degradation—leave behind a sticky, amber-yellow residue.
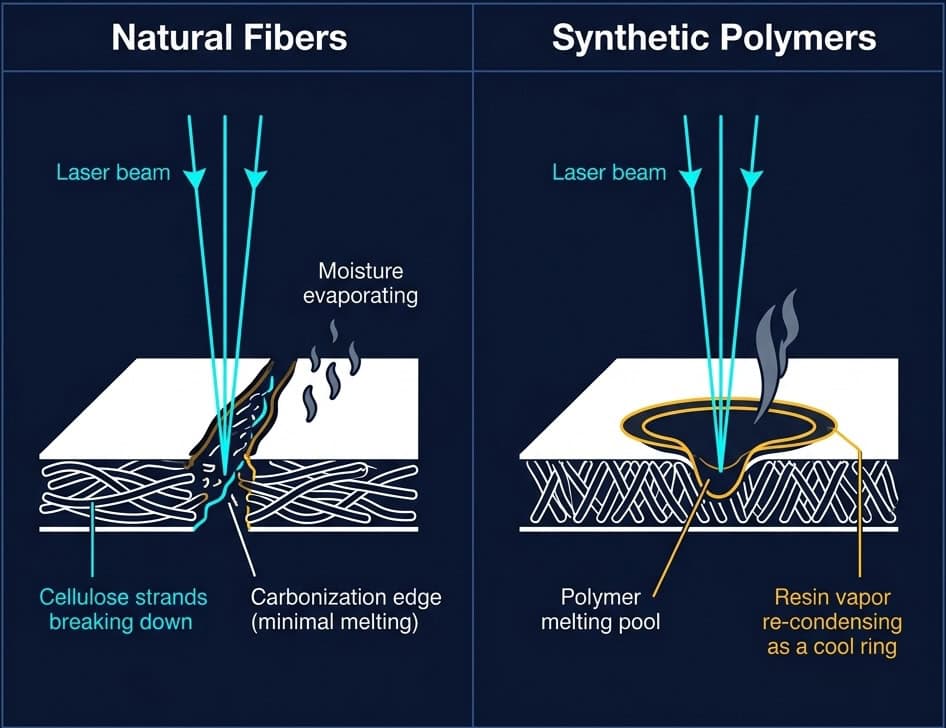
Figure 2: Micro-cross-section physics of laser cutting on white fabric. Left: Natural cellulose fibers undergoing pyrolysis and carbonization. Right: Synthetic polymers melting, vaporizing, and re-condensing resin smoke.
To be fair, yellow staining on white synthetics isn't caused by smoke condensation alone. Localized thermal degradation, heat-sensitive fabric dyes, chemical finishing agents, back-reflection from the bed, and dirty lenses all play a role.
However, one rule always holds true: The faster you clear the resin vapors and the less heat you dump into the material, the cleaner your edges will be.
There’s also a subtle accomplice: if you cut too slowly, excess heat bleeds sideways through thermal conduction. This heat isn't intense enough to vaporize the adjacent fibers, but it’s more than enough to cause light thermal breakdown, leaving the edges stiff and discolored.
Note: If you’re processing fabric blends, coated textiles, or flame-retardant treated materials, their thermal behavior won't match pure fibers. Don't guess—always run a test grid first.
So Does Laser Cutting Actually Seal Fabric Edges?
This question comes up constantly in forums and factory floors alike. The short answer: it depends entirely on your material.
Synthetic fabrics (polyester, nylon, acrylic): Yes. The laser melts the cut edge, fusing it into a sealed border that resists fraying. For sublimation sportswear, this is actually one of the biggest selling points of laser cutting over blade cutting.
But this seal isn't bulletproof. As one experienced user on r/myog put it: "It won't fray by itself, but if there's abrasion on the sealed edge it can be broken and it might start fraying."
Natural fibers (cotton, linen, silk): No. They carbonize instead of melting — there's no melt seal. Edges will fray just like a scissor cut, sometimes worse. Common workarounds: Fray Check liquid, spray lacquer, or applying fusible interfacing before cutting.
Blends: Unpredictable. The synthetic component may partially seal, while the natural fibers still fray. Always test.
2. Parameter Tuning: Running a Race Against Time
The knobs on your laser software—Power, Speed, Frequency, and Focus—don't operate in isolation. They form a tightly coupled system.
Your goal comes down to a single principle: Deliver just enough energy to sever the fibers, while keeping heat dwell time and smoke residence time as short as humanly possible.
You are running a race against time.
Maximize Speed, Minimize Power
This is the most fundamental tuning rule, yet most operators do the exact opposite.
Intuition says: "If it's not cutting through, crank up the power!" But on white fabric, your golden rule should be: Lock in the highest speed your motion system can handle cleanly, then find the absolute minimum power required to pierce the material.
Why?
A slow-moving laser beam—even at low power—acts like an iron resting on your shirt. Prolonged dwell time allows heat to bleed outward through the weave, expanding the Heat-Affected Zone (HAZ) like an inflating balloon.
For delicate materials like white silk or chiffon (often less than 1mm thick), push your speed to the upper limit of your machine and dial the power down as low as possible.
How do you find that sweet spot? Run a power sweep grid.
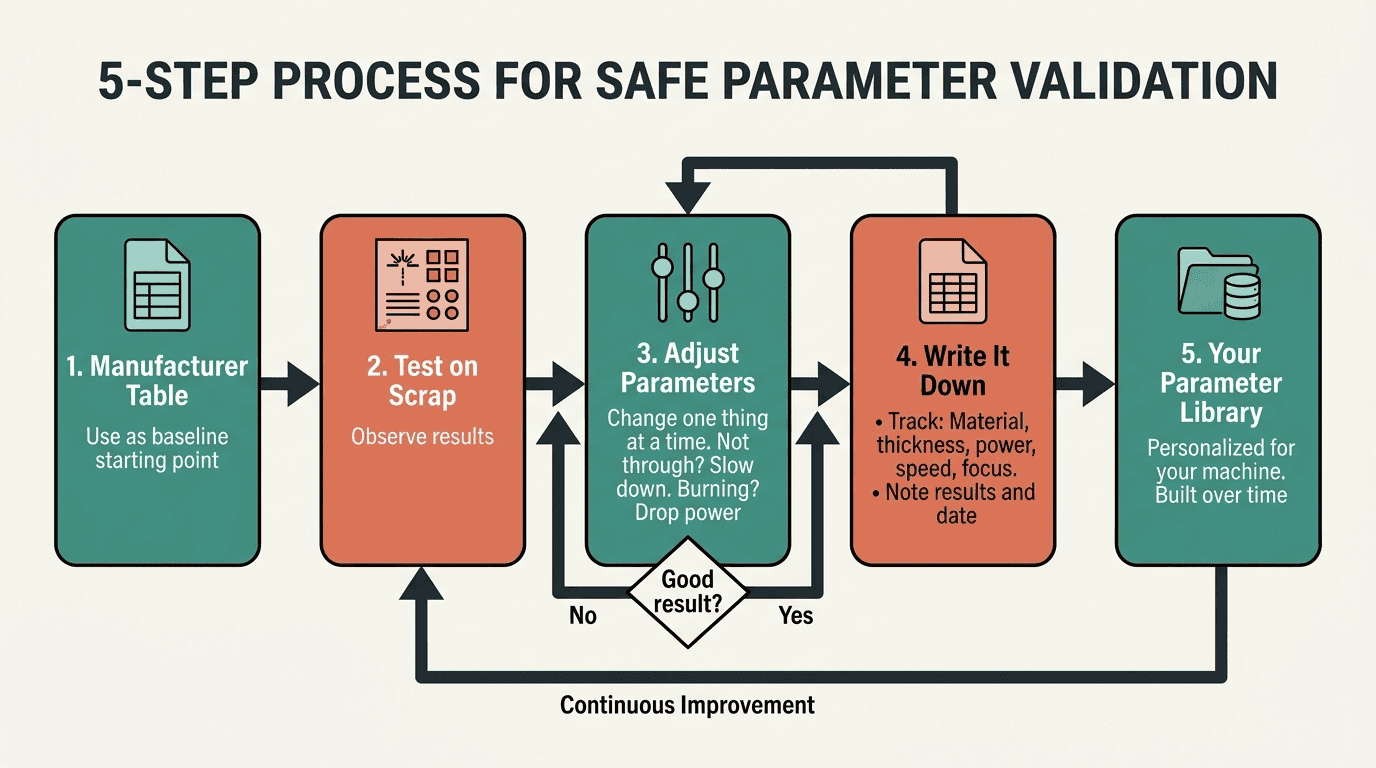
On a piece of scrap fabric, lock your speed at a high value. Start power at a low baseline and step it up in small increments until the laser just barely cuts through without leaving uncut threads.
Stop right there.
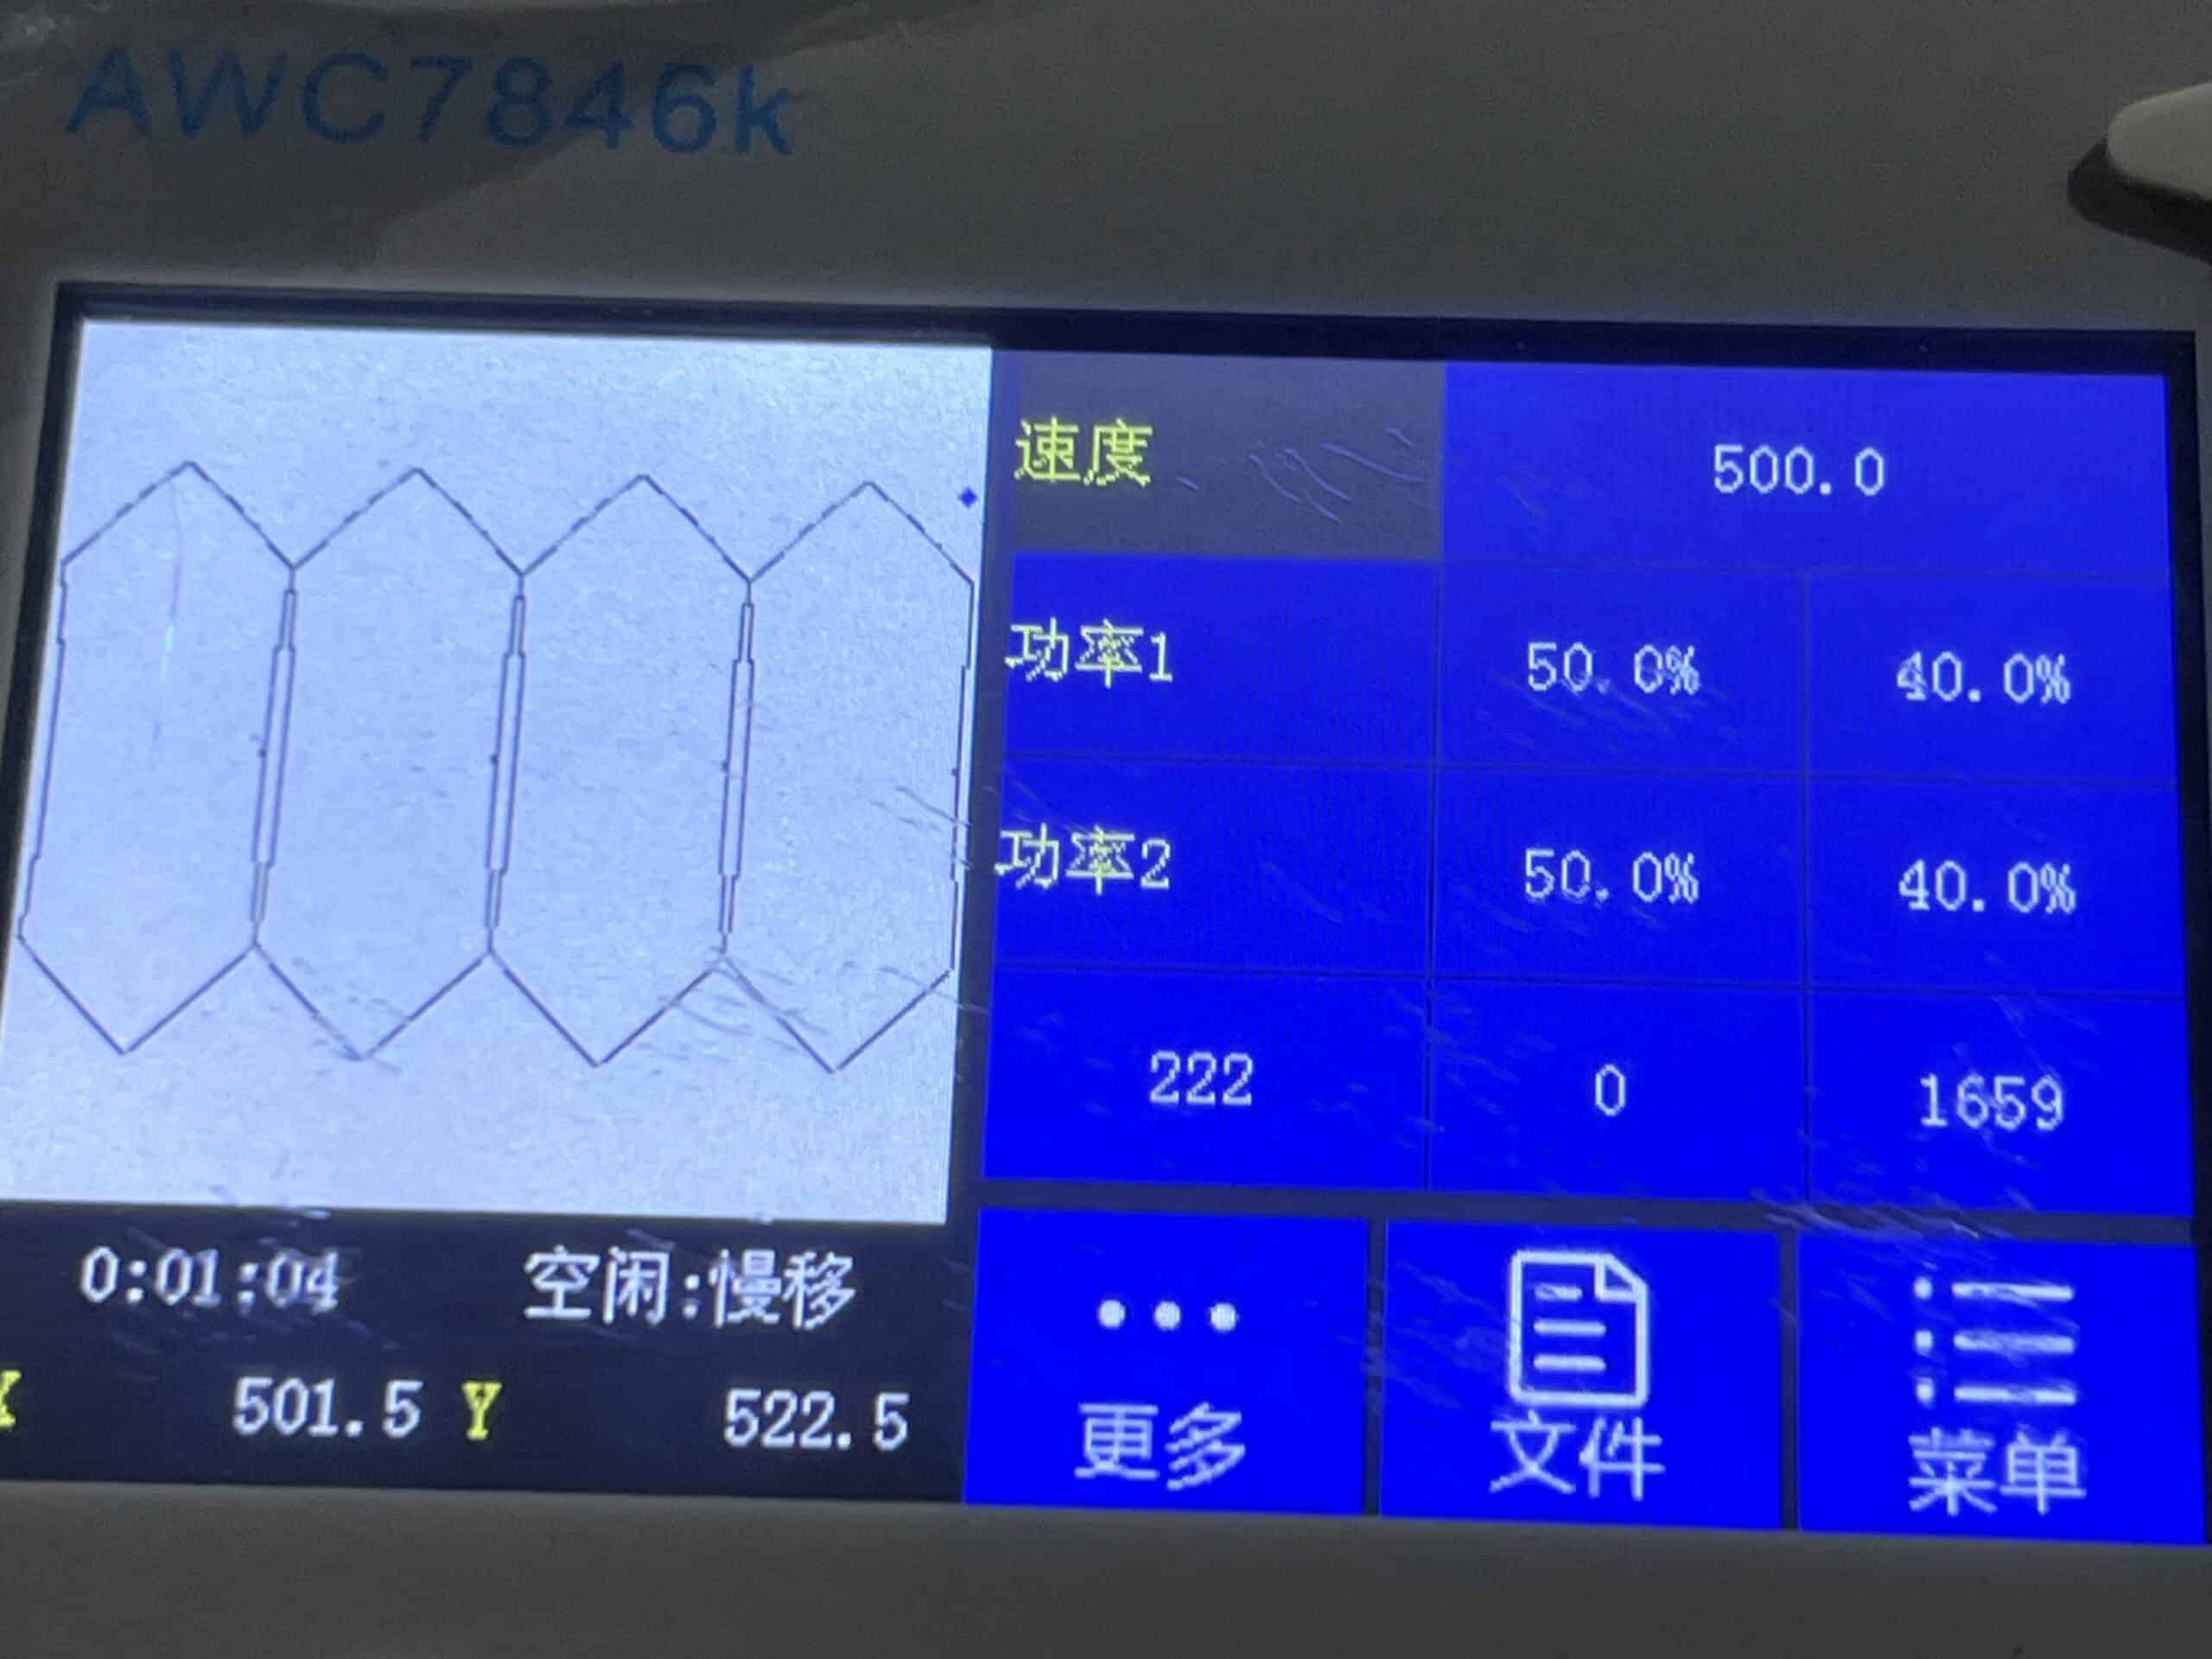
Figure 3: Power and speed test grid matrix on fabric to pinpoint the threshold where material is fully severed without excess heat input.
Any power beyond this threshold will not only be wasted—it gets dumped into thermal conduction, radiation, and vapor overheating, sharply raising your risk of discoloration. Every extra watt goes somewhere, and on white fabric, nowhere good.
⚠️ Can You Stack Multiple Layers to Cut Faster?
This is one of the most common questions I see in laser cutting communities. The short answer: not recommended. Stacking traps heat between layers, dramatically increasing fire risk. The top layer may cut cleanly while lower layers char, melt together, or even ignite. For production throughput, single-layer automated roll feeding is both faster and safer than stacking. If you absolutely must cut two layers, run extensive fire-safety tests first and never leave the machine unattended.
Pulse Frequency: Deeper Than You Think
Pulse frequency determines how many times per second the laser pulses energy. This controls how thermal energy accumulates over time.
Before tweaking frequency, however, you need to understand your light source: Are you running a DC Glass Tube or an RF Metal Tube?
Glass Tubes (DC-Excited):
Glass tubes are the workhorses of the textile cutting industry. They offer unbeatable bang-for-your-buck and handle high-volume production easily. However, their dynamic pulse response is physically limited. High-voltage gas discharge takes time to strike and extinguish, and DC power supplies have limited modulation bandwidth.
On a glass tube machine, the "Frequency" setting on your controller usually adjusts the PWM signal frequency sent to the power supply or cornering power rules—it isn't toggling the optical laser output at ultra-high speeds. Increasing this setting can lead to pulse lag or trailing waves.
If you're using a glass tube cutter on white fabric, don't waste hours chasing micro-adjustments on the frequency dial. Put your energy into the variables that deliver massive impact: actual power-to-speed ratios, focal placement, assist air pressure, and exhaust flow.
RF Metal Tubes (RF-Excited):
RF lasers (such as those from Synrad or Coherent) use radio-frequency electromagnetic fields to excite the gas. They offer blistering pulse modulation speeds (often tens to hundreds of kHz) with steep rise/fall times. This allows for precise pulse energy delivery and clean thermal cutoffs—a huge asset for high-speed, zero-char micro-cutting.
RF tubes carry a significantly higher upfront cost. However, for 24/7 high-speed production lines requiring extreme edge consistency, their longevity and beam stability can lower long-term Total Cost of Ownership (TCO).
Intentional Defocusing: A Counter-Intuitive Hack
Textbooks tell you to align your focal point precisely on the material surface for the smallest spot size and maximum energy density.
When dealing with hyper-sensitive white synthetic fabrics, try the opposite: deliberately raise your focal point slightly (defocusing by +0.5mm to +1.0mm).
By raising the Z-axis slightly, the laser beam spot size widens at the material surface. This flattens the intense energy peak at the center, distributing energy more gently across the cut line.
The total energy remains identical, but the peak thermal load on individual fibers is reduced. For thin white synthetics, this softer energy distribution can slice the fibers while creating a smooth, melted edge sealed without dark oxidation.
Caution: Defocusing widens the kerf width and reduces penetration depth. If defocused too far, the broader beam can actually increase the Heat-Affected Zone. Use this as an experimental variable during test cuts, not a default setting.
Beam Quality: The Hidden Killer
You can tune speed, power, and air assist all day, but if your laser tube produces a poor beam profile, white fabric will expose it instantly.
Beam quality is measured by its Transverse Electromagnetic Mode (TEM). An ideal laser output operates in the TEM00 mode—a pure Gaussian distribution where energy is densely concentrated in the exact center and drops off sharply toward the edges.
When a TEM00 beam hits white fabric, the center instantly vaporizes the material, leaving virtually no excess heat for the surrounding fibers.
If your laser tube has inferior optics or thermal distortion in the resonant cavity, the beam degrades into a multi-mode profile. Instead of a sharp needle point, the energy splits into multiple peaks or forms a low-energy halo around the main spot.
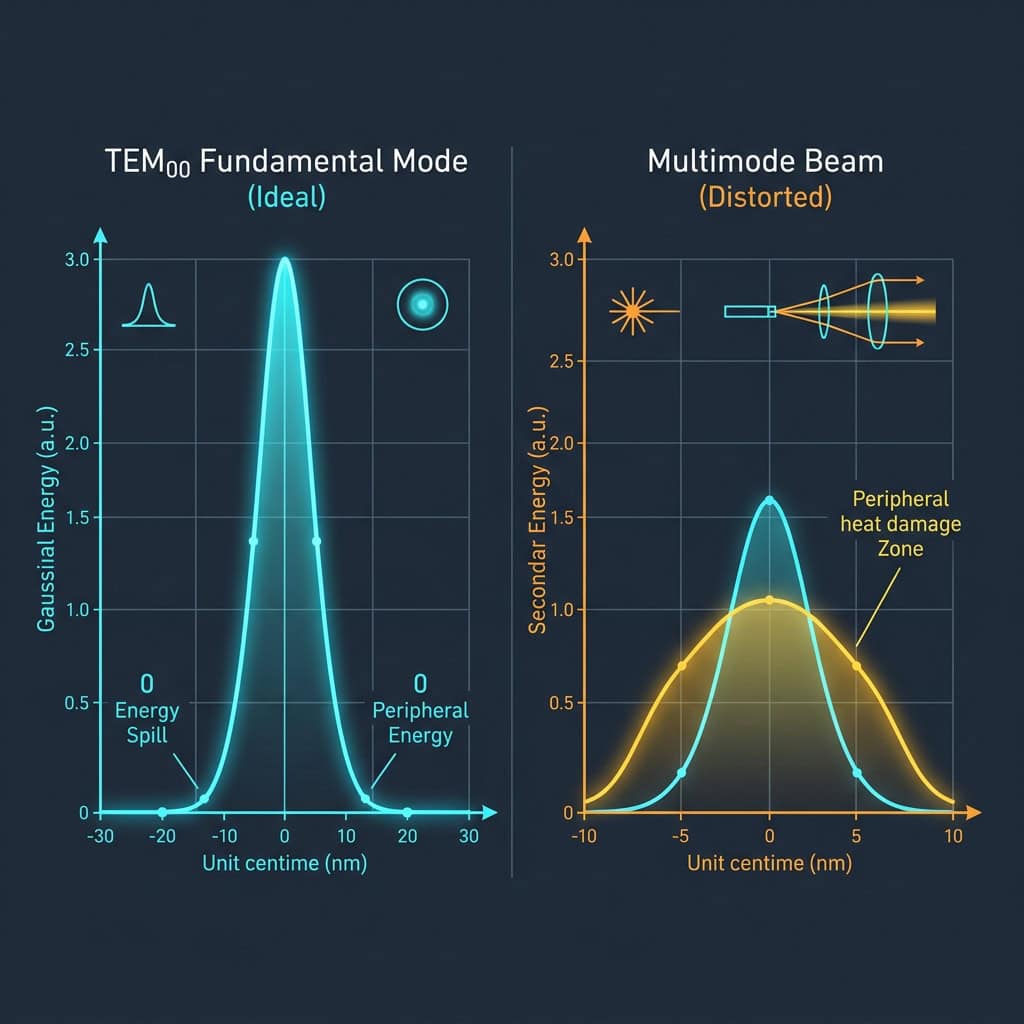
Figure 4: TEM00 Gaussian beam energy profile vs. multimode laser halo chart. The outer halo is the primary culprit behind edge discoloration on white fabrics.
That halo is a nightmare for white fabric.
The energy in the halo isn't strong enough to vaporize the material, but it sits right in the temperature zone that bakes, chars, and oxidizes cellulose and polymers. The edges char before the center even cuts through.
How to test your beam profile: Place a thick block of acrylic directly in front of the laser tube exit port and fire a quick pulse (a pulse/dot test). If it burns a sharp, perfectly symmetrical conical hole, your beam mode is clean. If the hole is oval, flat-bottomed, or shows secondary halos, your tube or alignment mirrors need attention.
3. Machine Architecture: Gantry vs. Galvo Systems
Equipment design dictates your thermal control limits. The two dominant motion architectures in industrial laser cutting—X-Y Gantry and Galvo (Galvanometer Scanner)—handle heat completely differently.
X-Y Gantry Systems
Gantry machines move a heavy mechanical cutting head across X and Y linear rails using belts or ball screws.
- Pros: Massive working areas (e.g., 1600×1000mm up to multi-meter conveyor beds), perpendicular 90° beam delivery across the entire bed, and the ability to mount tight coaxial air assist nozzles right at the cut point.
- Cons: Mechanical inertia. A cutting head assembly weighs several kilograms. While it moves fast in straight lines, it MUST decelerate when approaching sharp corners, tight curves, or intricate patterns.
During that brief deceleration window, the laser continues firing while the head slows down. Thermal dwell time spikes, dumping excess heat into the corner. The result? Corner burning—unsightly yellow spots on every sharp turn of a white garment panel.
Galvo Scanning Systems
Galvo systems eliminate heavy moving heads altogether. They steer the laser beam using two ultra-light mirrors mounted on high-speed rotary galvanometers, focusing through an F-Theta field lens.
- Pros: Blistering speed (1,000 to 5,000+ mm/s) and virtually zero mechanical inertia. The beam flicks across the material instantly, eliminating deceleration pause at corners. Heat has no time to conduct sideways, making it ideal for intricate lace, laser-perforating, and micro-detail cutting on thin white fabrics.
- Cons: Limited field of view (typically 110×110mm up to 300×300mm), angular beam entry at bed edges (causing edge taper on thicker stock), and an inability to use close-proximity coaxial air assist nozzles.
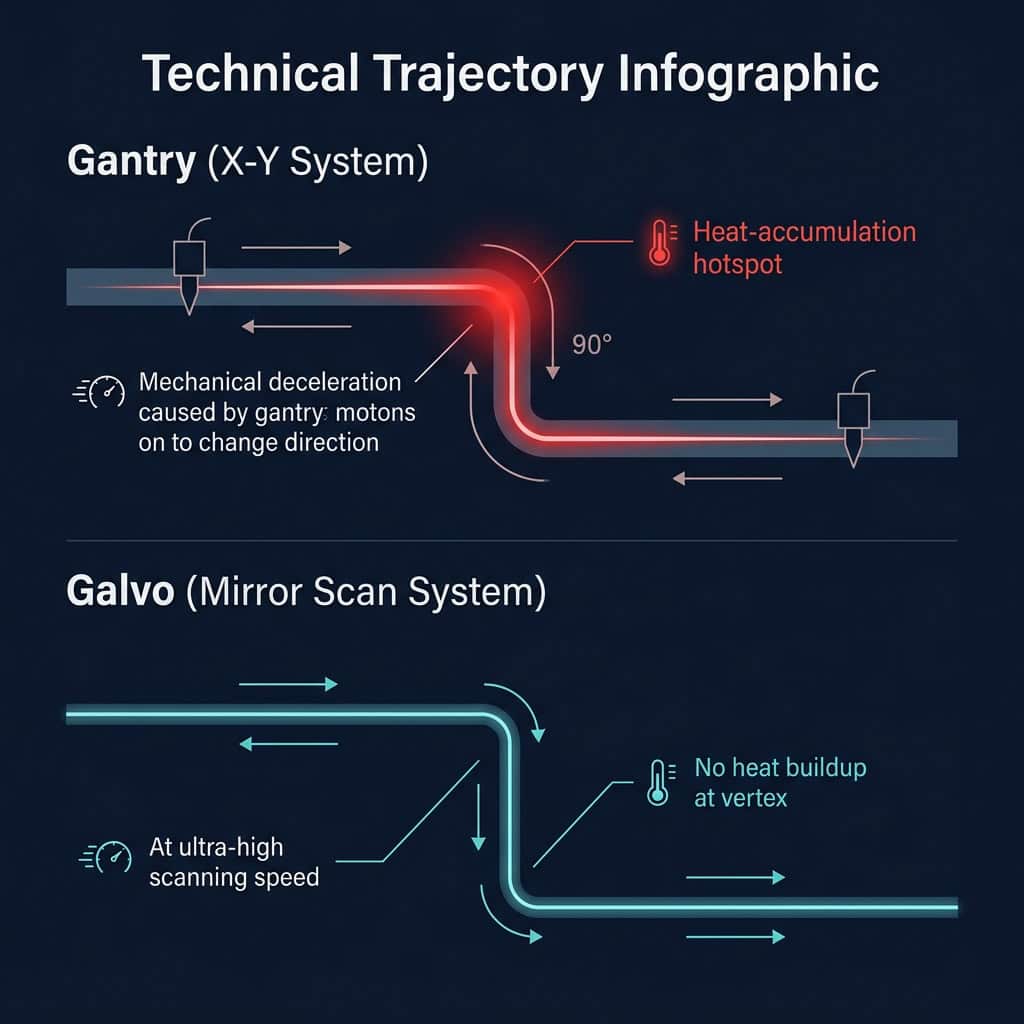
Figure 5: Gantry motion deceleration causing corner dwell heat accumulation vs. Galvo high-speed scanning trajectory comparison.
Summary for Equipment Selection:
- For large garment panels and heavy textile roll cutting, a Gantry system with optimized corner power rules is the industry standard.
- For small-format intricate lace, badges, and ultra-thin white synthetic perforation, a Galvo system provides unmatched thermal protection against corner charring.
A Note on Laser Tube Selection
For gantry-based textile cutting, beam mode stability over long production runs is critical. Tube degradation shows up first as subtle edge yellowing — long before the tube actually fails to cut.
When choosing a CO₂ glass tube for white fabric work, look for three things: high TEM00 mode purity (>95%, to eliminate the outer thermal halo that bakes edges), internal catalyst coating (extends tube life and prevents gradual power drop-off), and quality output optics that resist thermal lensing under continuous firing. In the 80–130W class, tubes from manufacturers like RECI have been a reliable choice in our experience, though there are other solid options on the market.
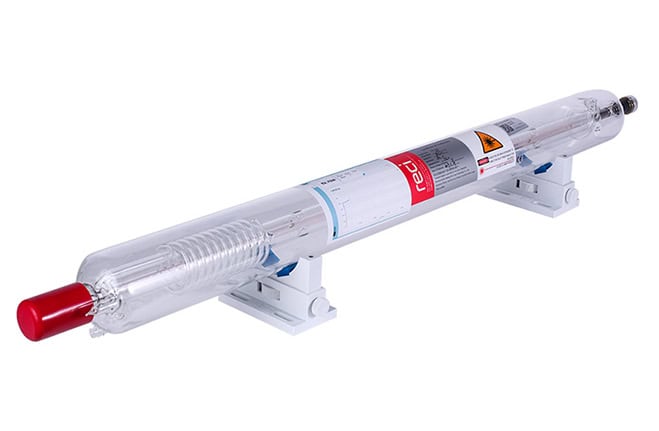
Figure 6: A catalyst-coated CO₂ glass laser tube. The internal coating recombines decomposed gases to maintain stable output over thousands of hours.
4. Assist Gas and Airflow: Your Invisible Shield
If parameter tuning minimizes heat generation at the source, assist gas and ventilation manage the damage once heat is created.
Compressed Air: High Pressure vs. Low Pressure
Coaxial compressed air blown through the nozzle serves two roles:
- Kinetic Ejection: Blasts away vaporized resin, hot carbon particles, and airborne smoke out of the beam path.
- Convective Cooling: Cools the immediate kerf wall to suppress charring.
Air pressure management is critical:
- Heavy White Canvas/Denim: Requires higher air pressure to flush out heavy molten dross from deep cuts.
- Ultra-Thin White Silk/Chiffon: High pressure will blow the lightweight fabric upward, creating ripples, fluttering, and defocusing. Use a gentle, controlled breeze—just enough to protect the lens and clear smoke without disturbing the material plane.
Nitrogen Assist: The Ultimate Anti-Yellowing Tool
If yellowing remains an issue, switching from compressed air to High-Purity Nitrogen (N₂) is a game-changer.
Oxygen in ambient air acts as a primary reactant in combustion and thermal discoloration. When high-purity nitrogen is injected through the cutting nozzle, it floods the processing zone, displacing oxygen.
What happens in an inert nitrogen environment?
- Natural Cotton: Open flaming and rapid oxidation are dramatically suppressed. Charcoal formation is reduced because there is no oxygen to fuel micro-sparks.
- Synthetics (Polyester/Nylon): Nitrogen prevents hot resin vapors from oxidizing into amber-colored compounds, keeping melt-sealed edges crisp and pale.
Reality Check: A laser will always "burn" through the material — that's what lasers do. And coaxial gas nozzles on open bed cutters can't create a sealed inert environment; some ambient air will always diffuse in. But even a partial reduction in local oxygen levels yields an immediate, visible improvement in edge whiteness.
While nitrogen adds consumable cost (cylinders or an N₂ generator), for high-value white sportswear, sublimation jerseys, bridal wear, or medical textiles, eliminating yellow-edge reject rates quickly pays for the gas.
Downdraft Exhaust: Pulling Smoke Downward
Blowing air from above is only half the equation. If smoke has nowhere to go, it creates turbulent eddies over the fabric surface, cooling and staining the top face.
Industrial textile laser systems pair coaxial top-blow with a high-volume downdraft exhaust system underneath the bed.
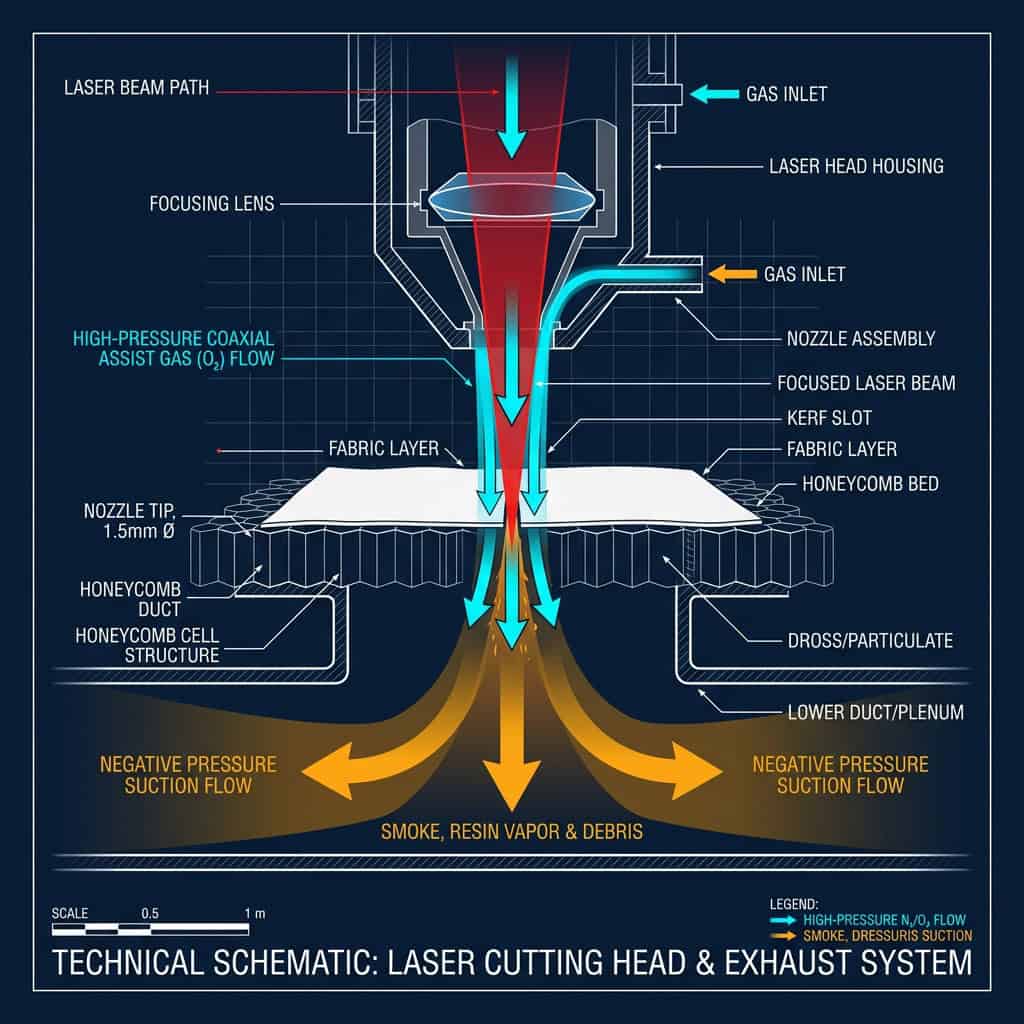
Figure 7: Coaxial air assist top-jet paired with high-volume downdraft exhaust airflow schematic, preventing resin smoke recirculation.
By maintaining strong negative pressure under the cutting surface, smoke and vaporized resin are pulled straight down through the cut kerf and out the exhaust duct before they can settle on the white fabric.
5. Eliminating Backside Flashback and Grid Marks
You fixed the top surface, but when you flip the fabric over, you find a repeating pattern of dark burn spots along the back.
This is backside flashback (or back-reflection).
What Causes Flashback?
When the laser pierces through the fabric, the residual beam energy hits the metal support structure below (honeycomb grid or aluminum slats). Energy reflects back upward into the underside of the fabric. At the same time, metal touch-points conduct intense heat into the fabric, while trapped smoke settles against the bottom face.
The Fix: Fabrics vs. Rigid Materials
Rigid Boards (Acrylic, Wood): Elevate the Workpiece
For rigid sheet stock, the fix is straightforward: lift the material off the bed using vector pins or standoff cones.
Lifting the board 10–20mm above the metal bed gives the pierced laser beam room to expand and lose focus before it hits anything, eliminating back-reflection. (Remember: Re-calibrate your Z-axis focus to the top surface of the raised board!)
Soft Fabrics: You Can't Pin-Elevate, So Pick the Right Worktable
You cannot elevate thin fabric on pins—it sags between support points, causing severe defocusing and distortion. Furthermore, roll-fed fabric processing requires automated material handling.
When processing textiles, preventing backside burn marks comes down to one hardware decision: picking the right worktable for your material and workflow.
In garment and textile factories, laser cutting tables typically fall into three main configurations:
-
Aluminum Knife Slats / Blade Conveyor Bed:
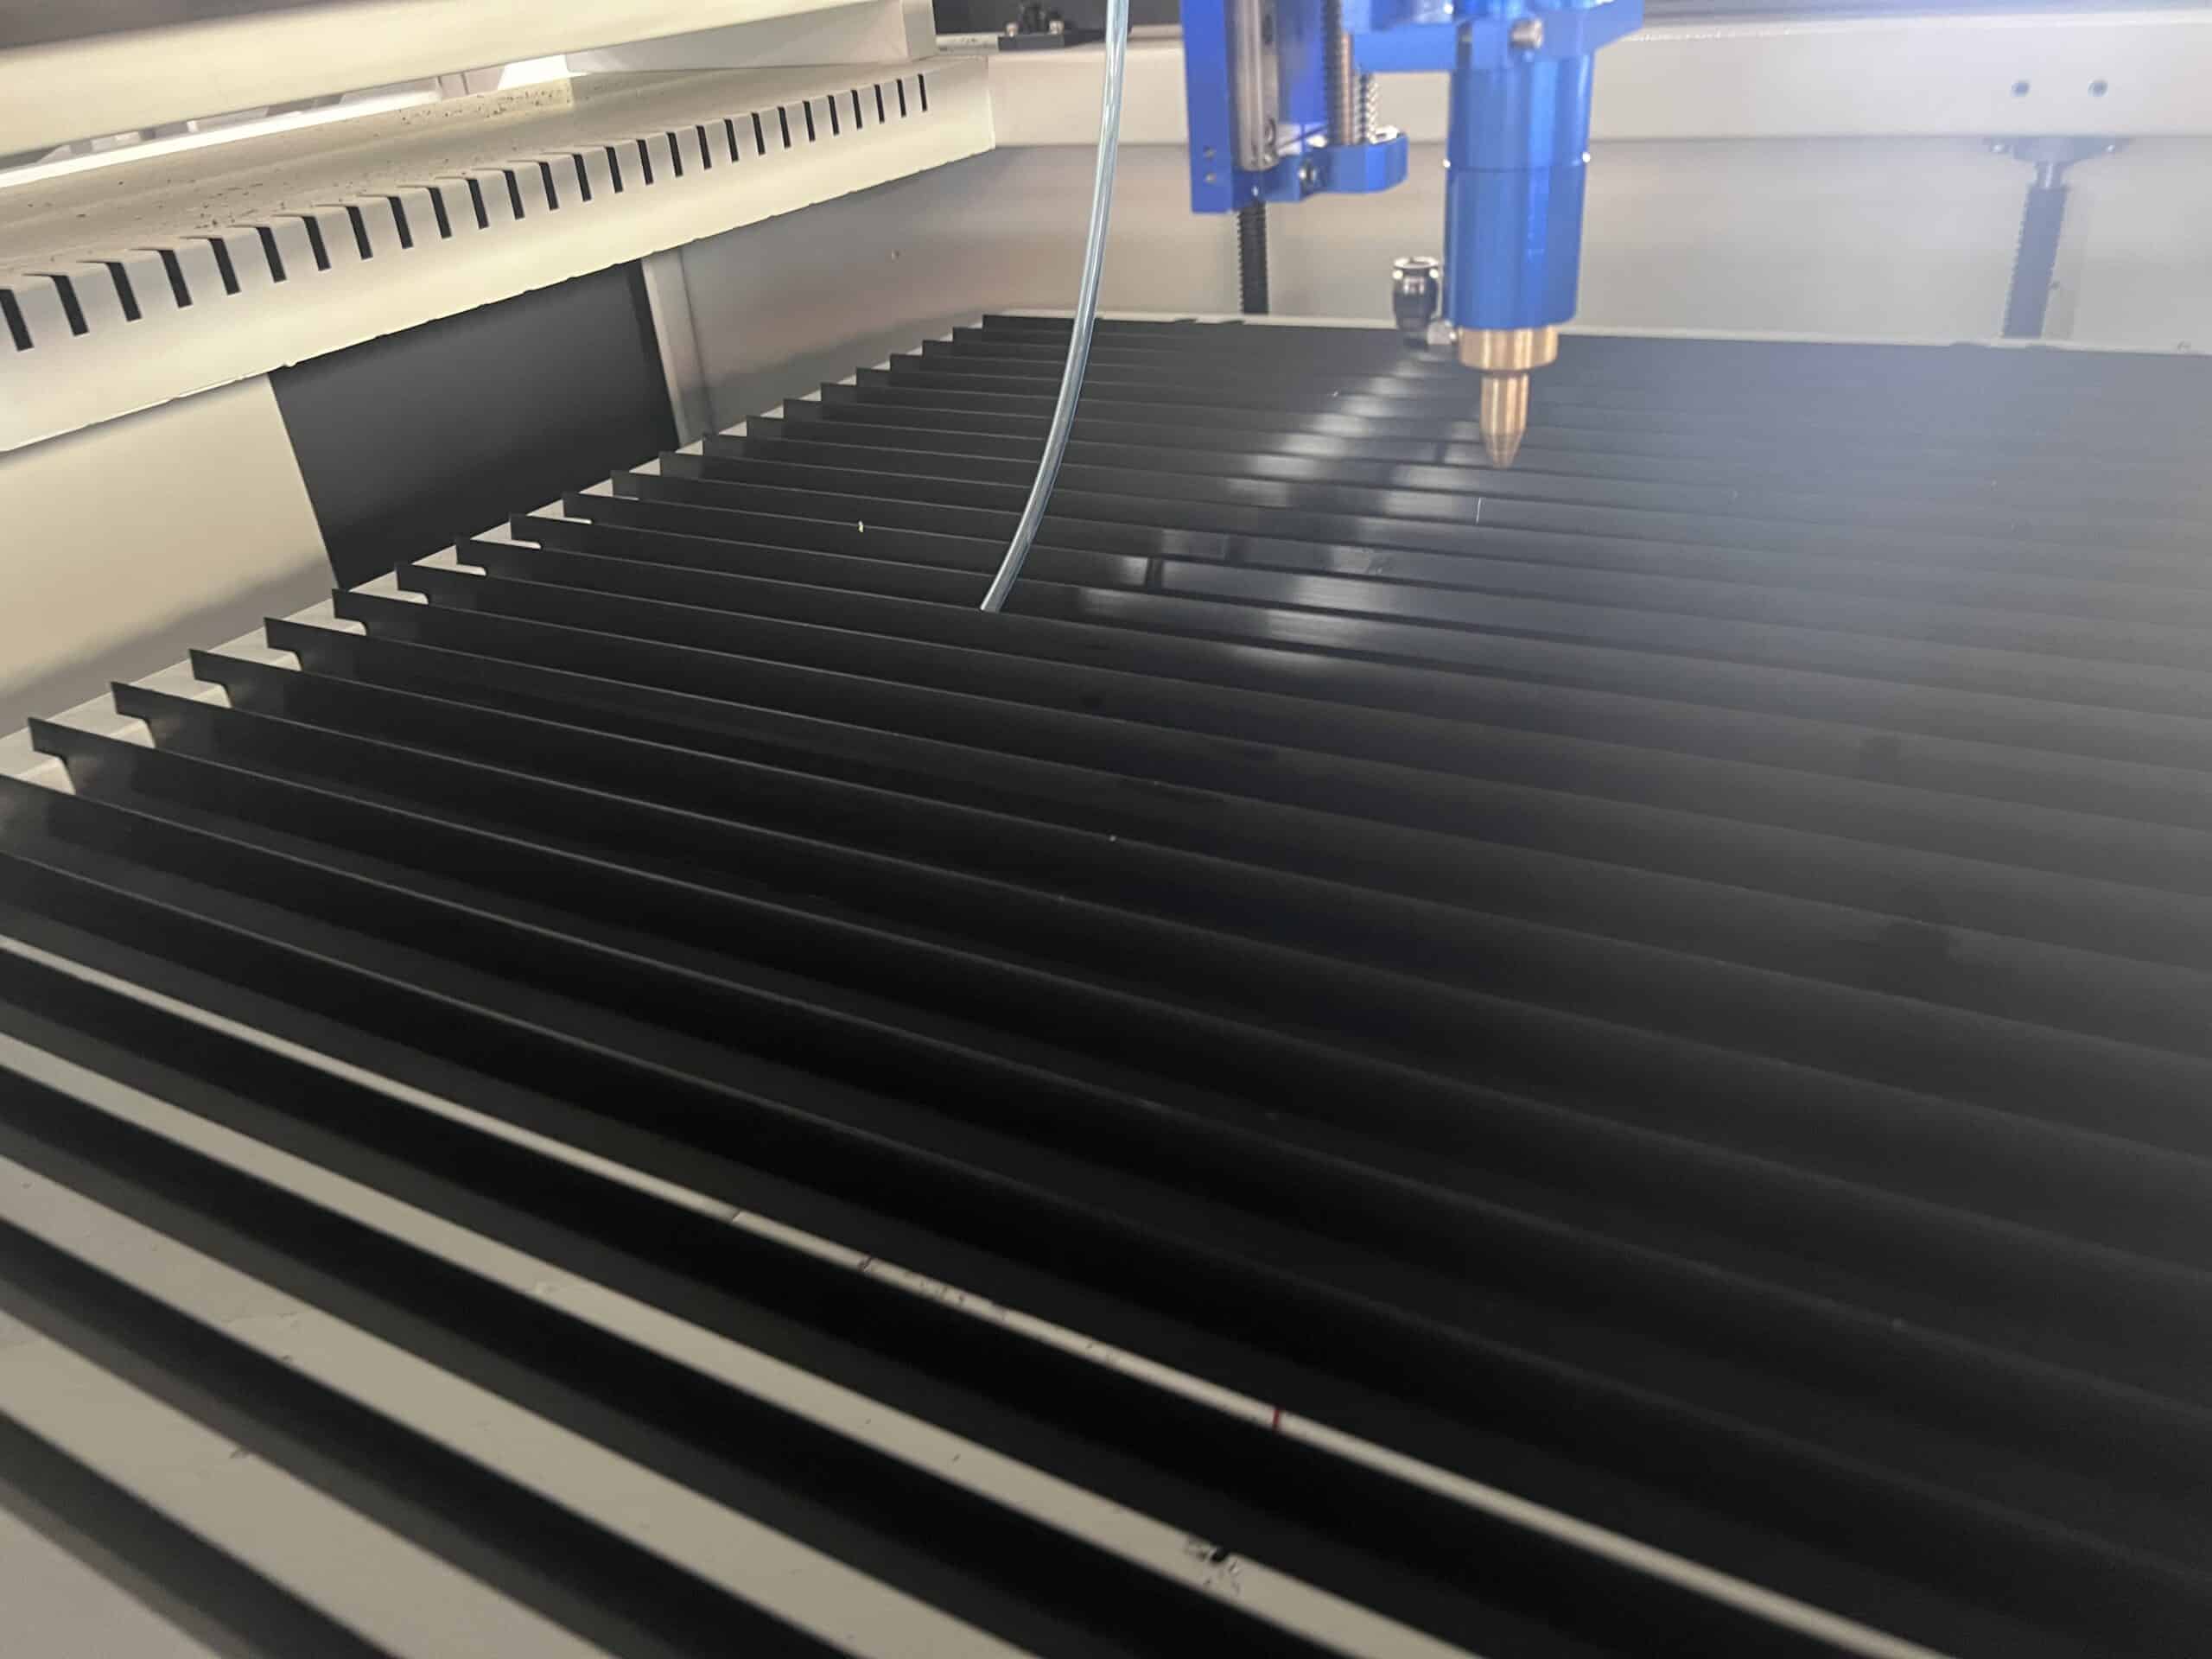
Figure 8: Aluminum knife blade bed (slat conveyor table). Ultra-narrow knife edges minimize contact area while wide open gaps maximize downdraft exhaust efficiency.- Mechanism: The fabric rests on thin, vertically standing aluminum blades (knife slats). For automated roll feeding, these slats are mounted onto a conveyor chain system.
- Performance: Minimal surface contact dramatically reduces heat conduction and back-reflection. The wide open gaps between blades allow downdraft exhaust to pull smoke straight down through the cut line.
- The Soft-Fabric Pitfall: Knife slat density is intentionally low, leaving gap widths of several centimeters. If you are cutting extremely soft, thin, or flimsy fabrics (e.g., thin polyester, silk chiffon, soft mesh), the fabric lacks structural rigidity. Under the downward pressure of coaxial air assist, the soft material sags into the gaps between slats! This sags the focus plane out of position, causing incomplete cuts, severe edge scorching, and snagging risk during conveyor movement.
- 💡 Shop-Floor Pro Tip (Paper Backing Hack): If you must process ultra-soft white fabrics on a slat bed (or wire mesh conveyor), place a layer of standard paper (e.g., cheap kraft paper, newsprint, or plotting paper) beneath the fabric. The paper provides a continuous flat support plane to prevent air-assist sagging while absorbing residual bottom heat and minor back-reflection.
- Verdict: The top choice for roll-fed apparel production and clean white fabrics (especially when paired with paper backing for soft materials).
-
Standard Honeycomb Bed:
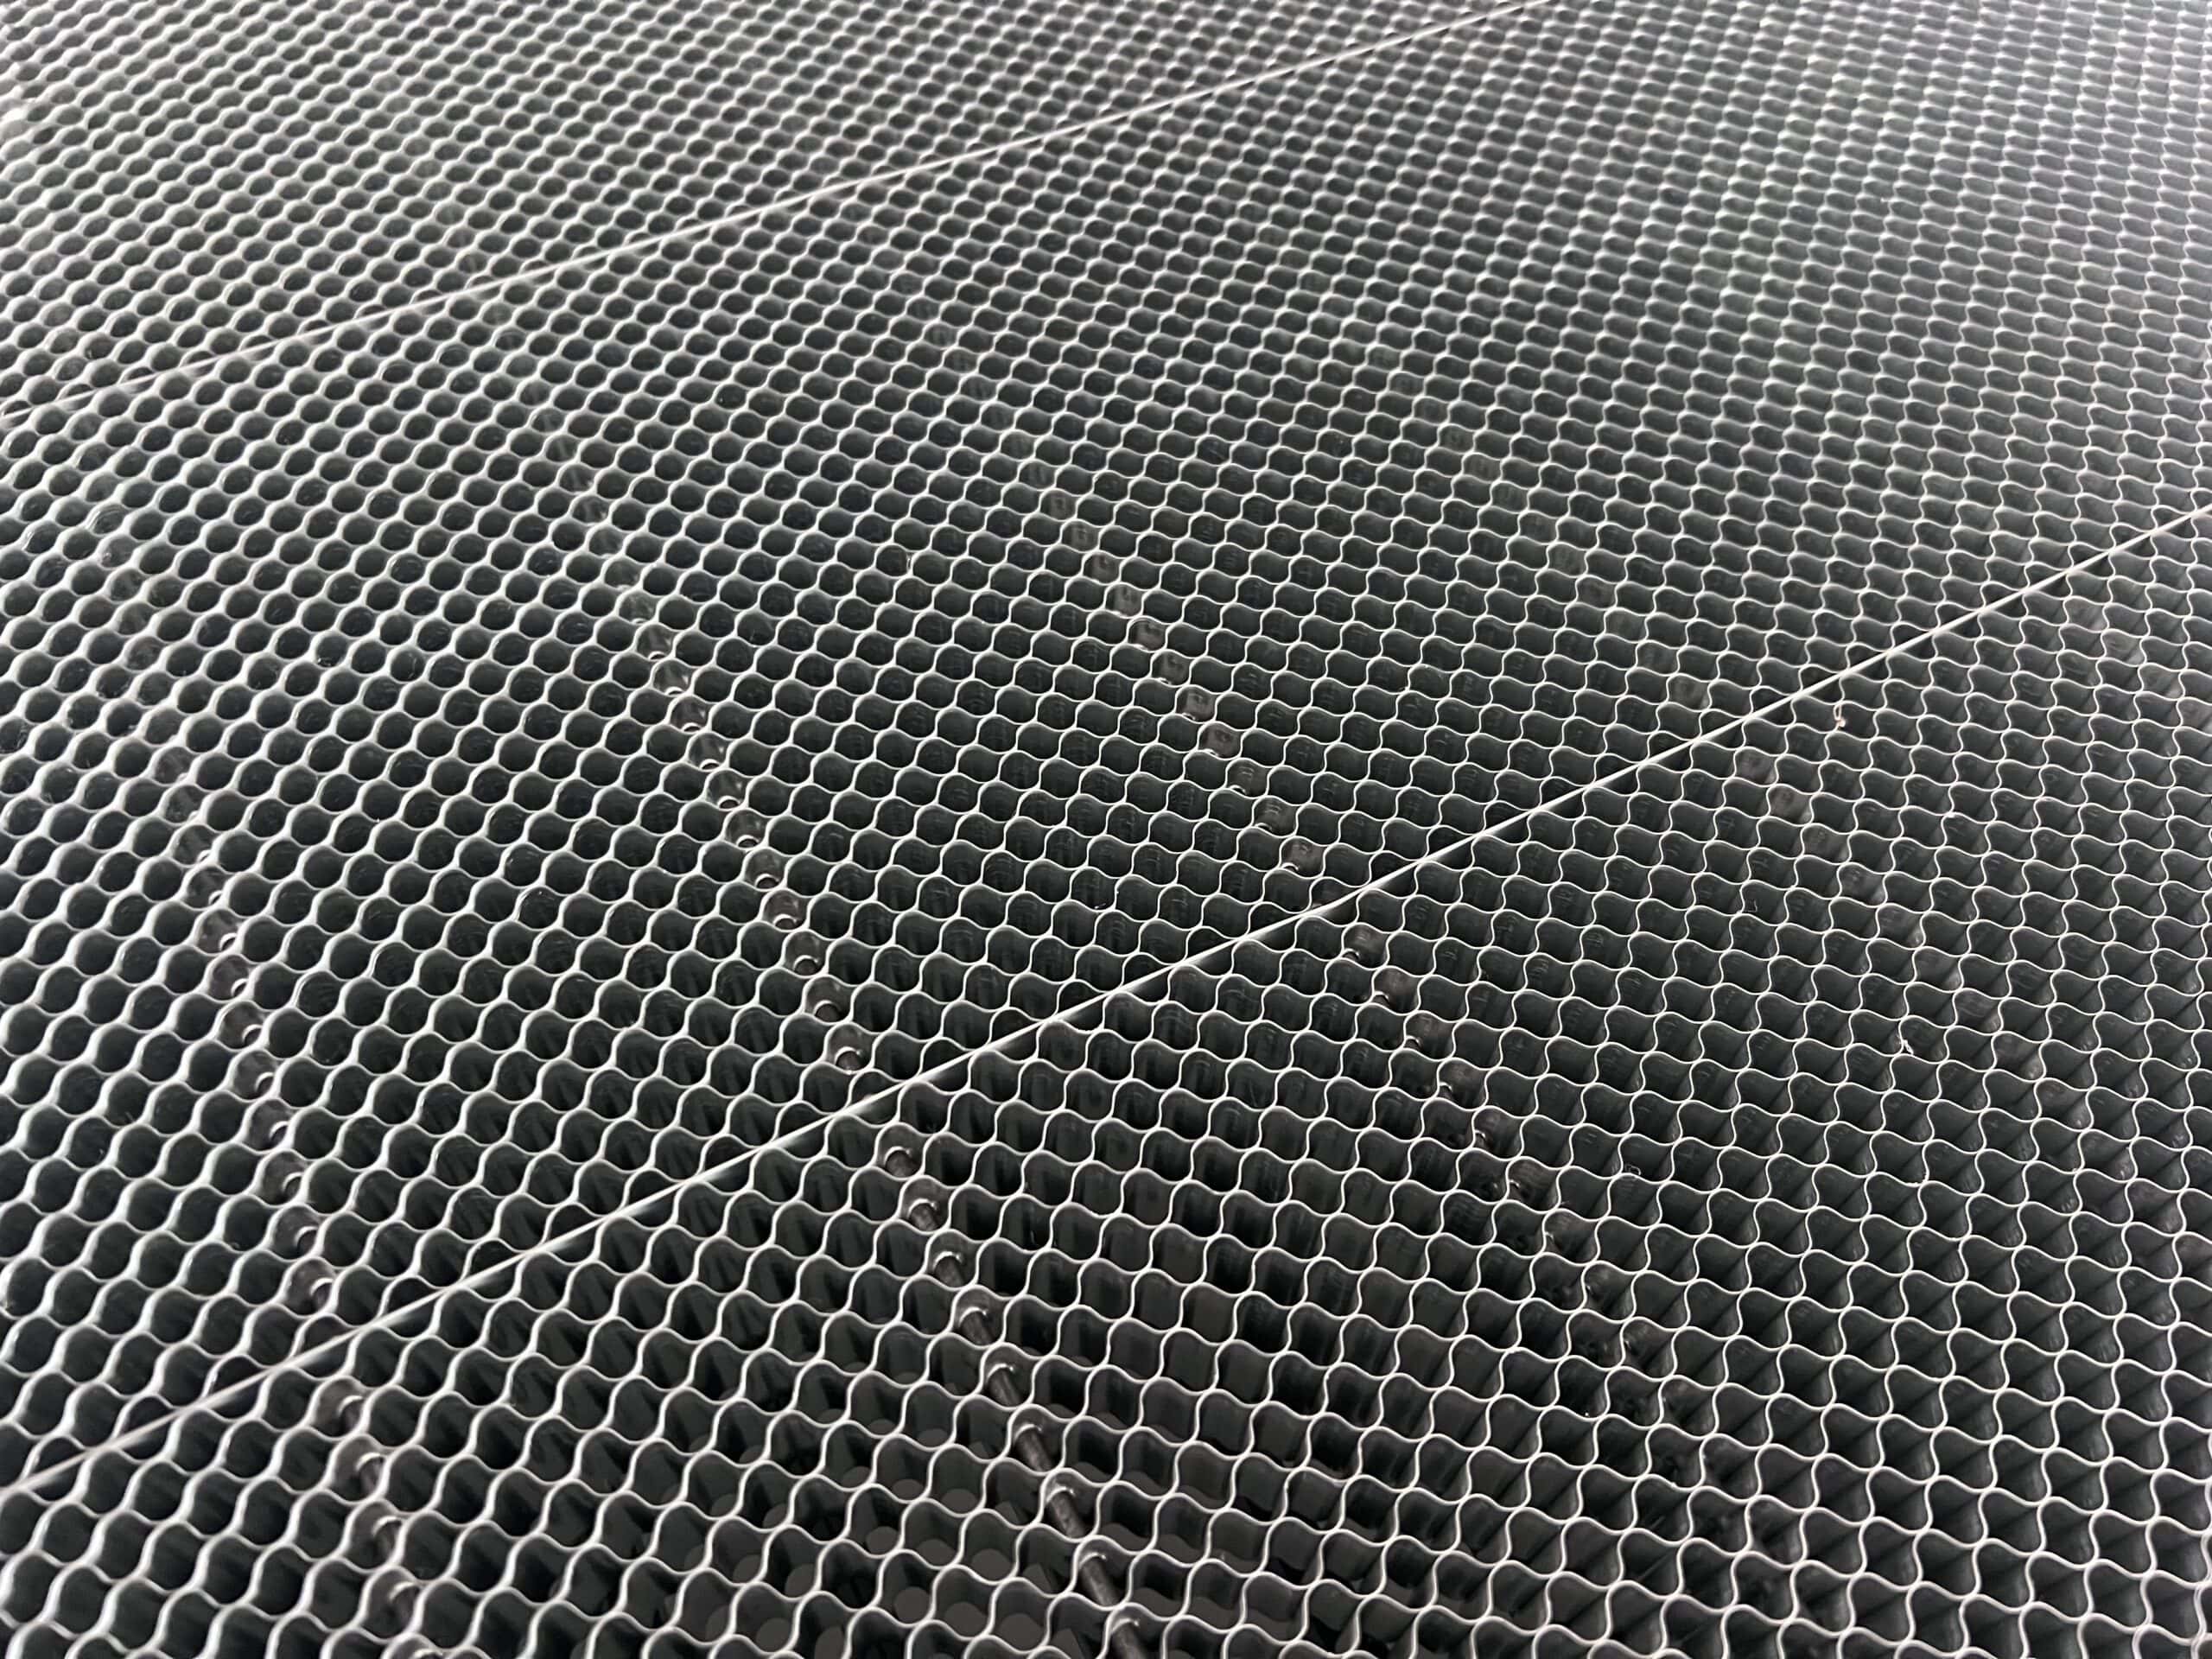
Figure 9: Standard Honeycomb Bed. A static matrix of hexagonal aluminum cells. Dirty cells or trapped resin tar can reflect laser heat and transfer yellow grid marks onto white fabric.- Mechanism: A dense matrix of hexagonal aluminum cells forming a static flat support plane.
- Performance: Provides flat, uniform support for small parts and pattern pieces, but creates a high surface contact area. Over time, dirty honeycomb cells trap sticky resin tar that bakes onto the underside of white fabric under laser reflection, leaving a distinct yellow grid pattern.
- Verdict: Great for small static cutouts and medium-weight fabrics, but requires regular degreasing and cleaning to prevent transfer stains on white fabric.
-
Wire Mesh Conveyor Bed:
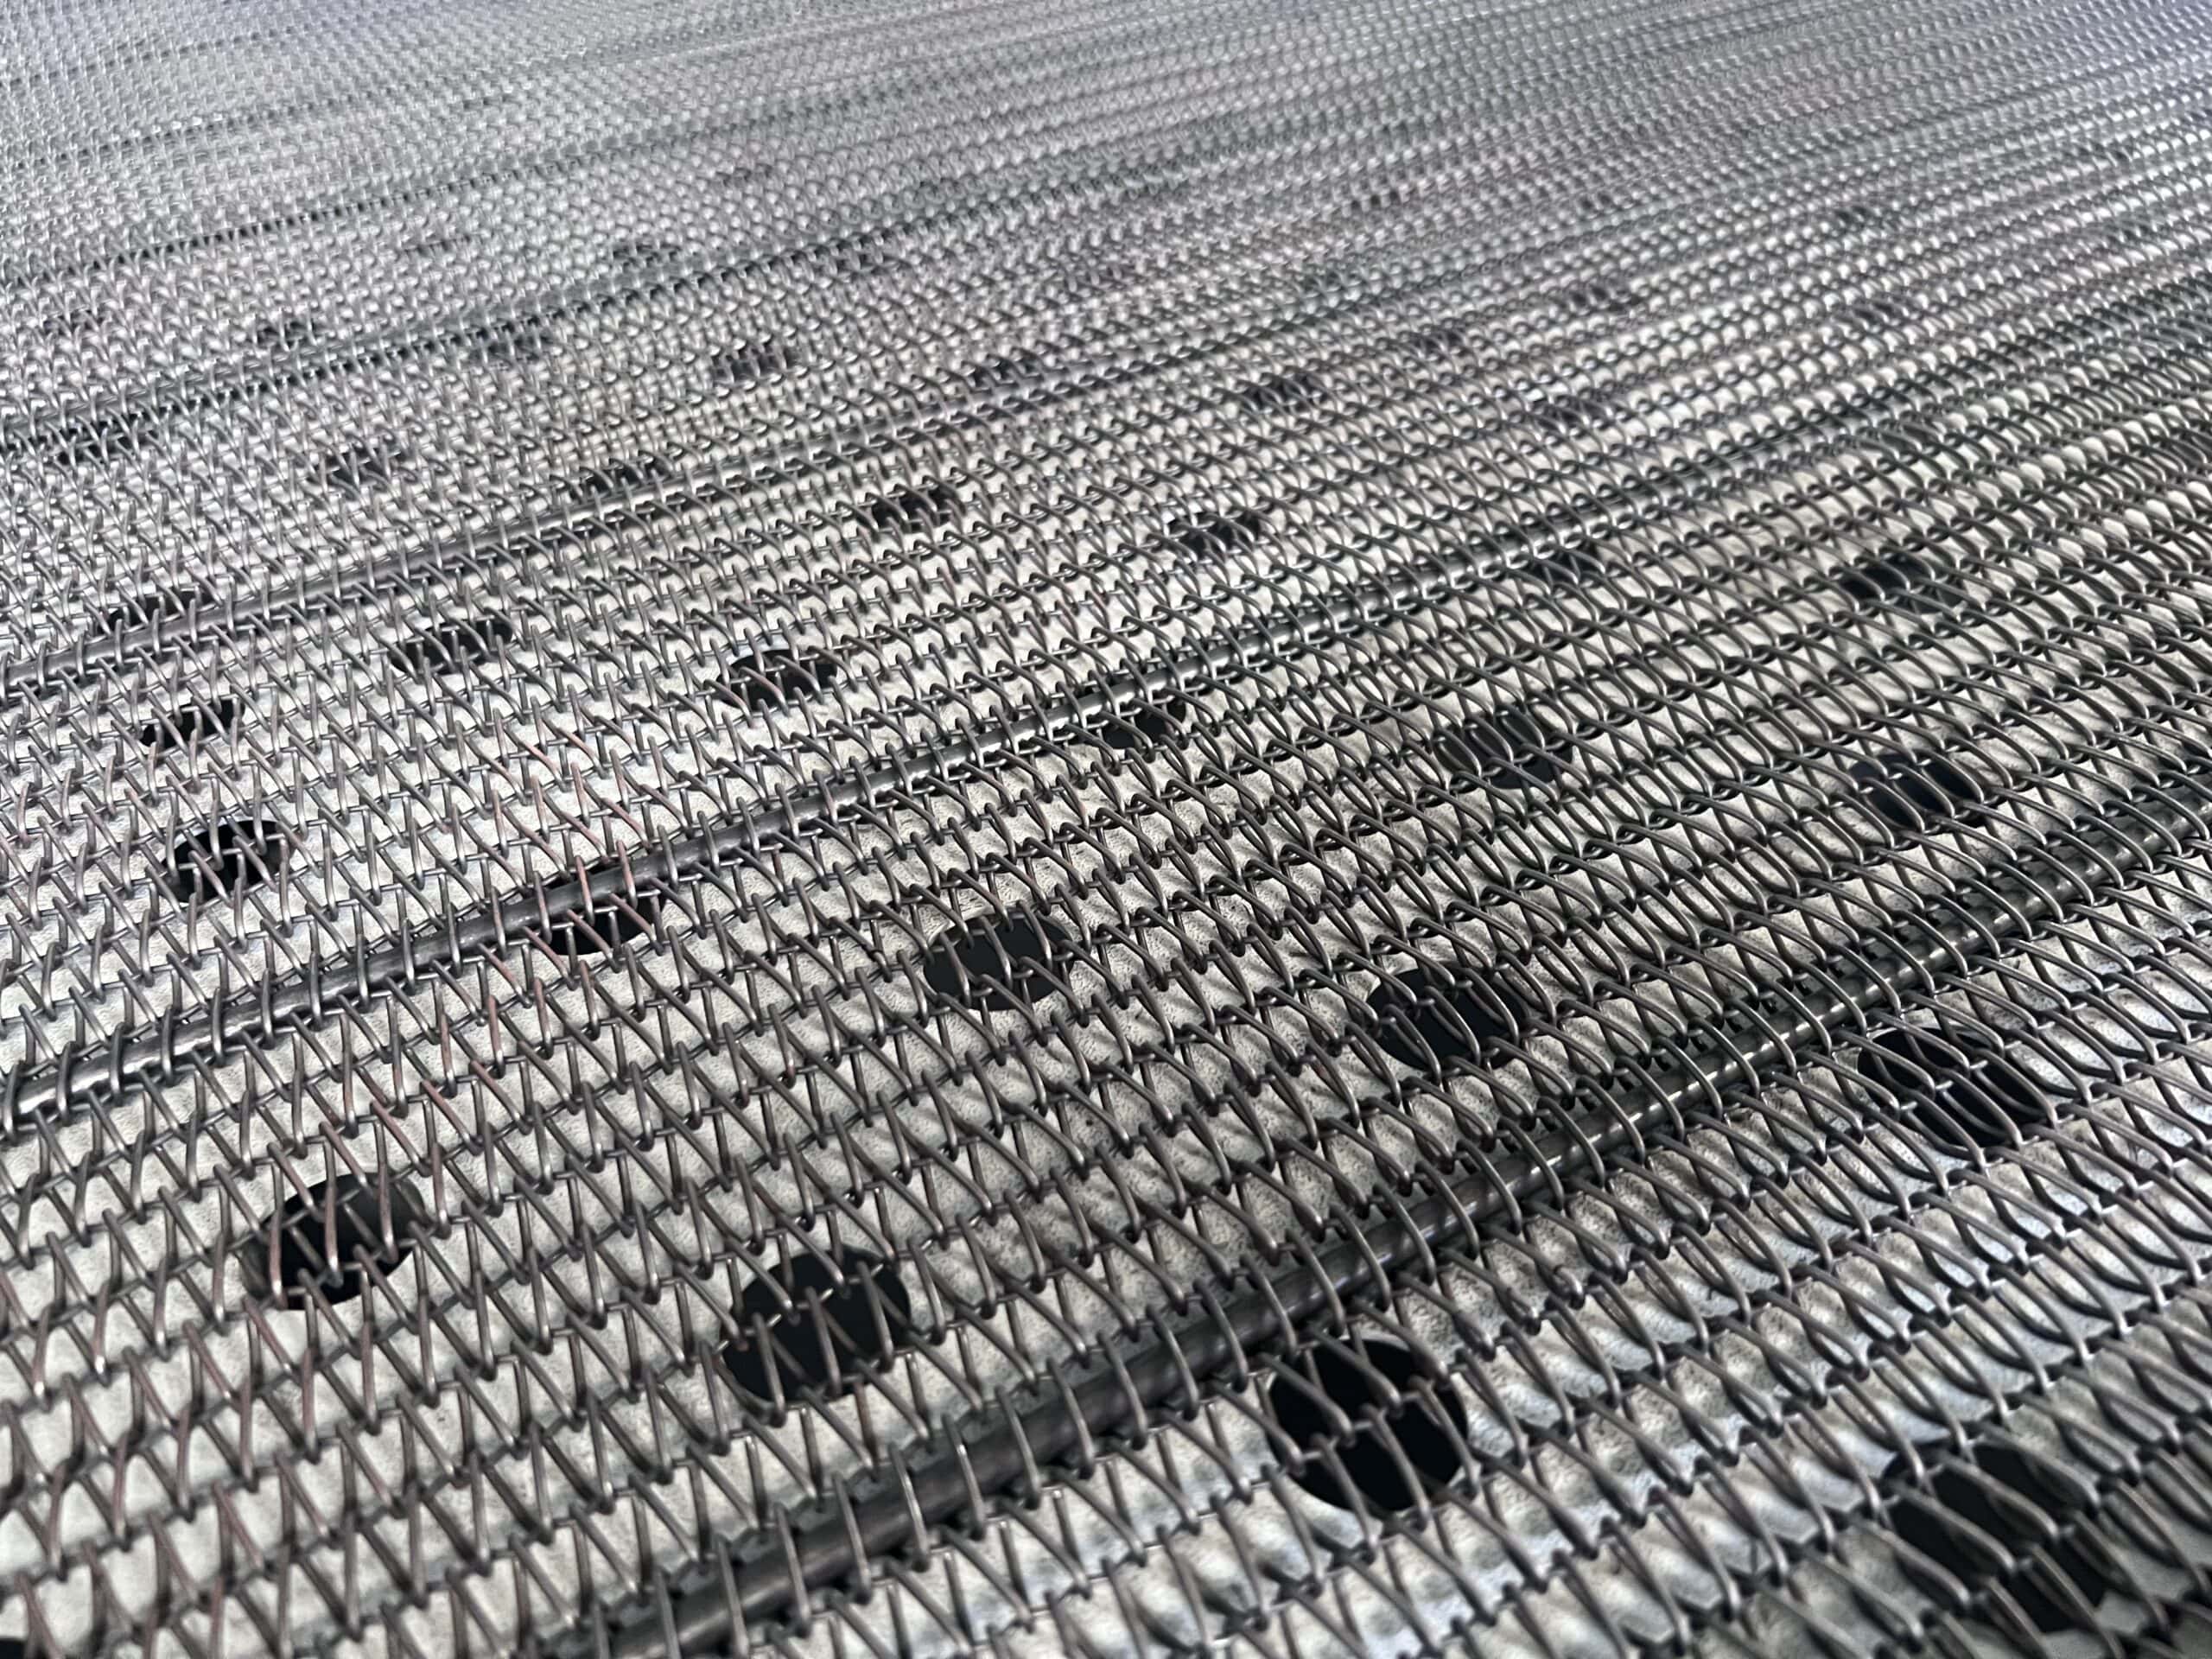
Figure 10: Wire Mesh Conveyor Bed with a low-perforation metal backing plate beneath the mesh belt, causing exhaust suction bottlenecks and secondary laser reflection.- Mechanism: A spiral woven wire mesh conveyor belt driven by side roller chains for continuous roll feeding.
- The Hidden Trap: Factory testing reveals a critical flaw common in lower-cost machines: many manufacturers install a low-perforation solid metal plate directly beneath the mesh belt to support the belt and catch scrap.
- Why It Causes Stains: The metal plate severely restricts downdraft ventilation. Trapped smoke recirculates under the fabric, staining the back face yellow. Furthermore, residual laser energy hitting the metal plate bounces back into the bottom of the fabric, inflicting secondary grid scorch marks. Tested performance on white fabric is often inferior to knife slats or clean honeycomb beds.
- Verdict: Acceptable for darker fabrics or medium backside tolerance, but avoid for premium white fabrics unless the underlying suction chassis features high open-area perforation.
How to Choose?
- White Fabrics + Automated Roll Feeding + Pure Backside Quality: Aluminum Knife Slats / Blade Conveyor is your best bet (use paper backing under ultra-soft fabrics to prevent air-assist sagging).
- Medium-Weight Fabrics + Static Cutting: Standard Honeycomb Bed works well, provided it is kept squeaky clean.
- Continuous Roll Feeding + Flexible Material Handling: Wire Mesh Conveyor Bed works, but verify downdraft ventilation and backing plate clearance first.
A Counter-Intuitive Hack: Flip-Cutting Composites
If you're processing multi-layer composite materials and struggling with top-surface staining, try flipping the material upside down.
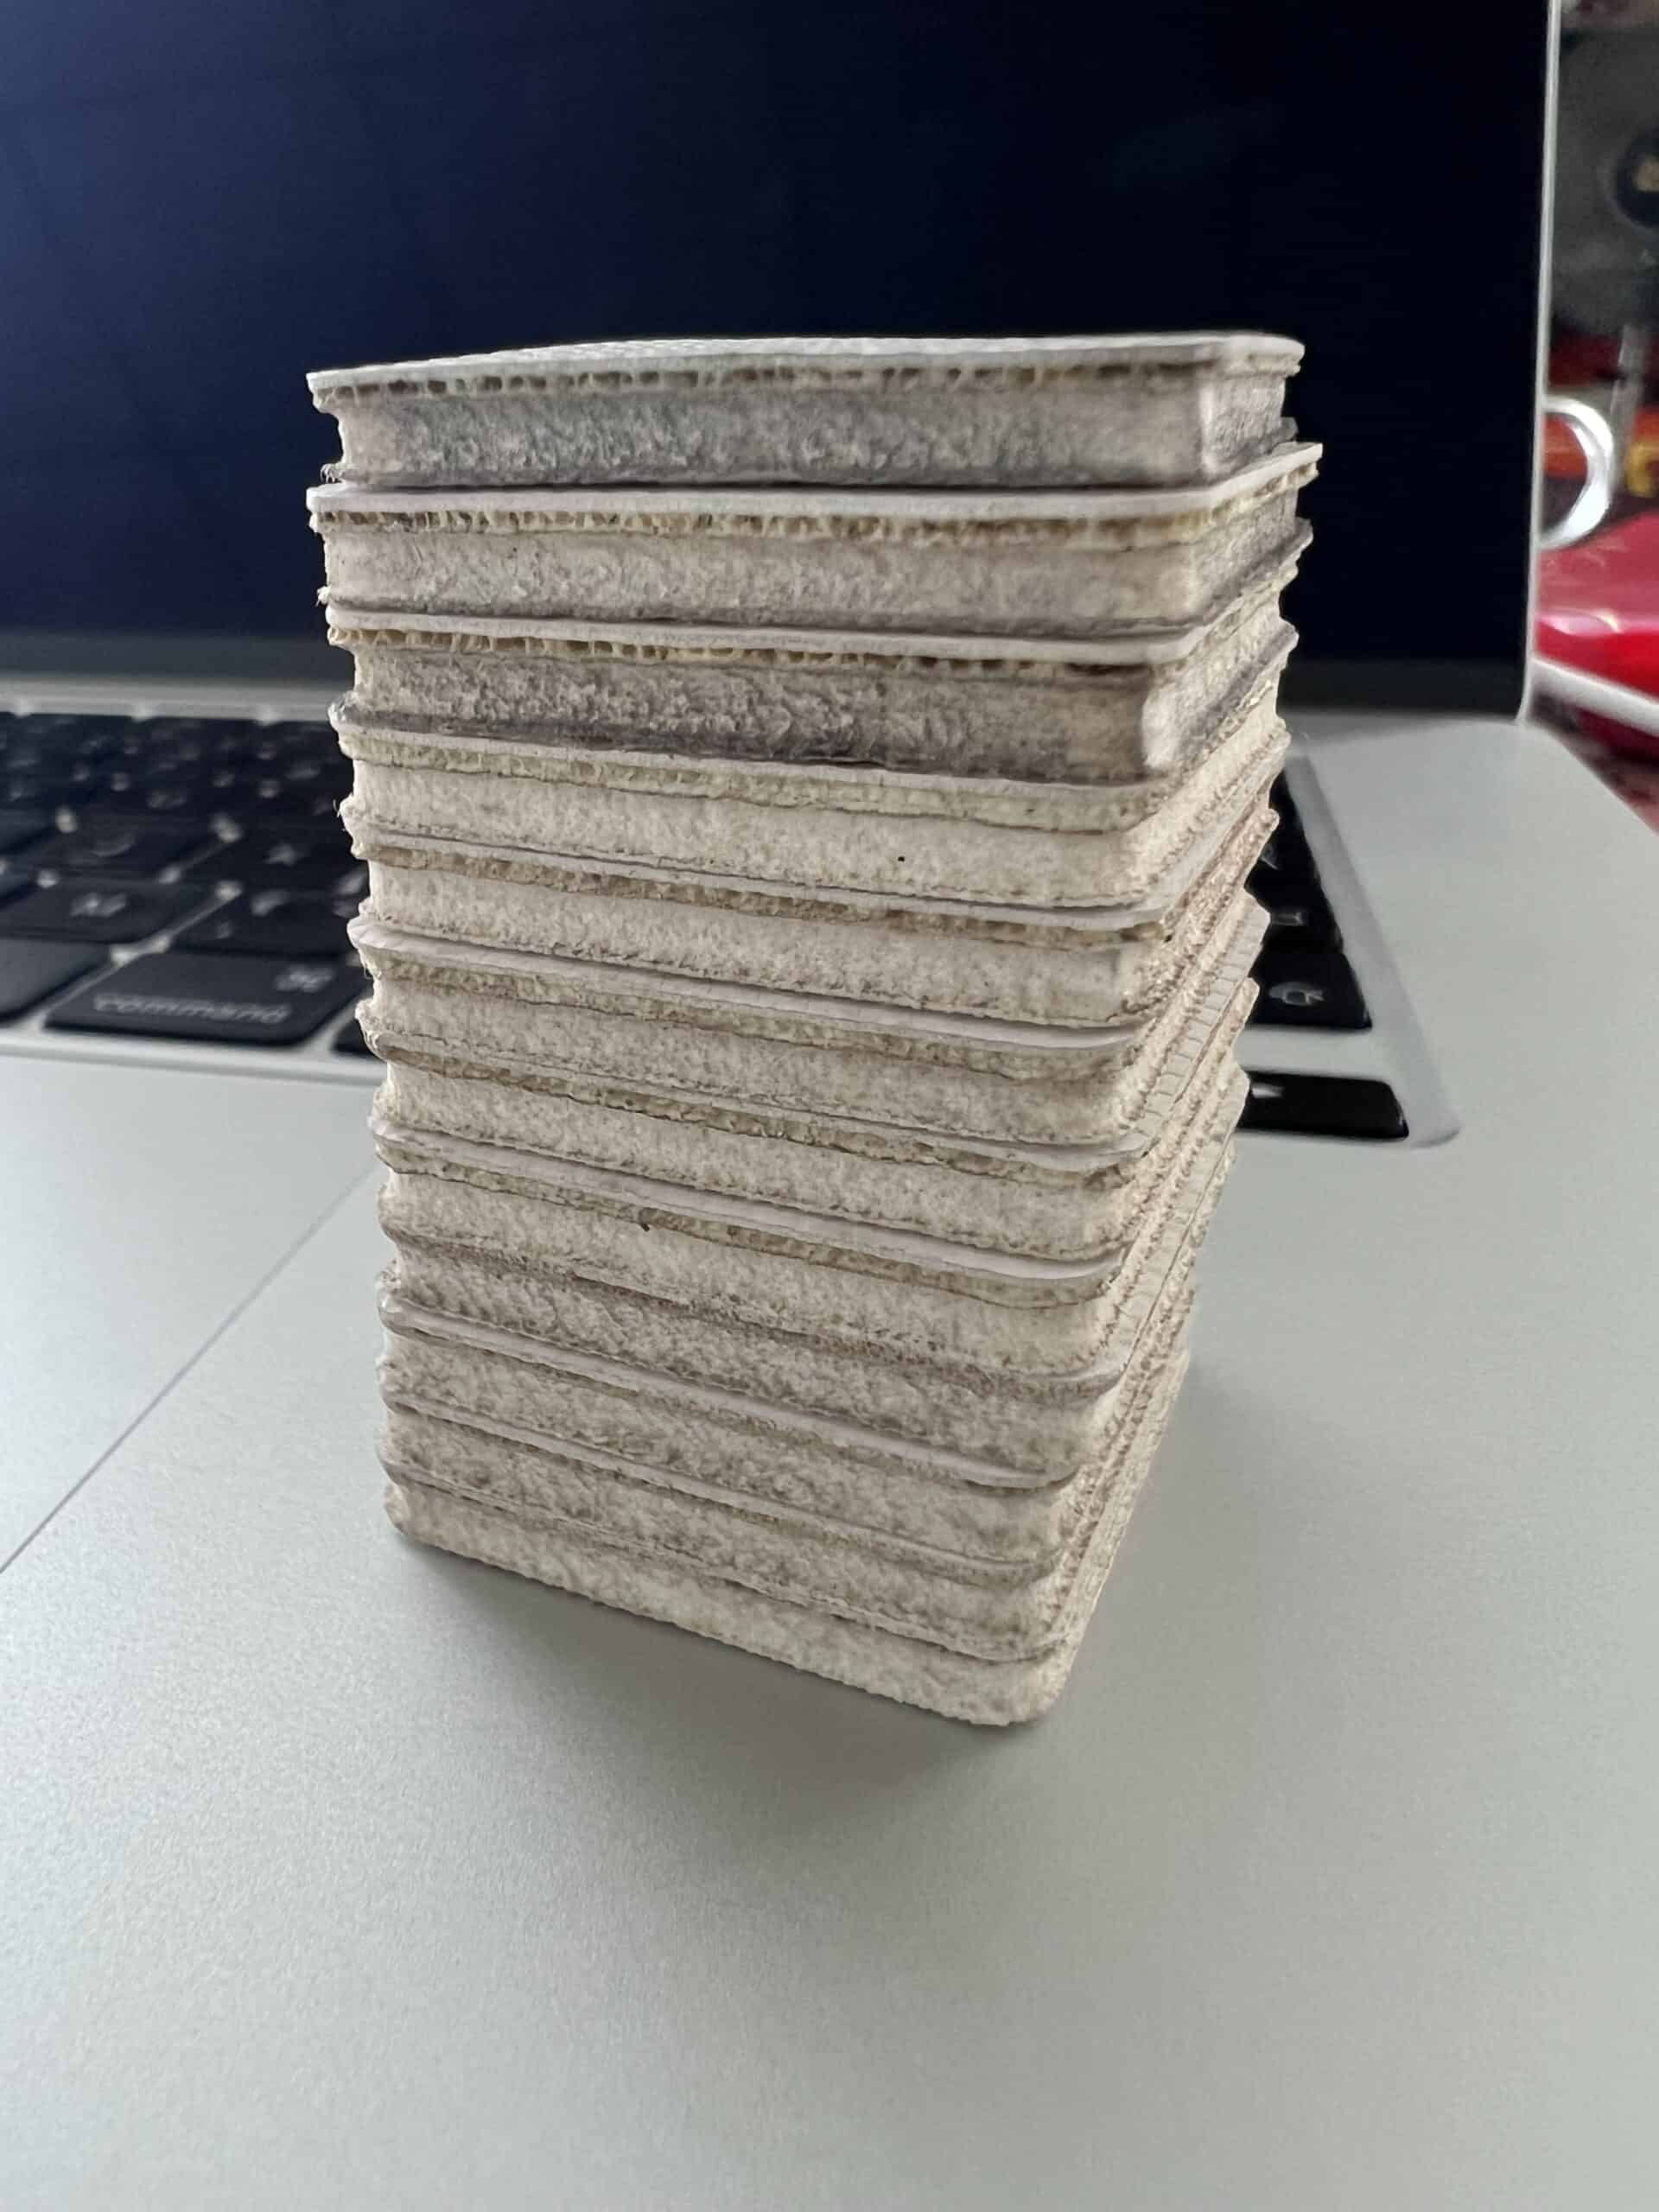
Figure 11: Upside-down flip cutting technique. Cutting with foam side up allows heavy PU resin smoke to exit downward, keeping the pristine white foam layer clean.
Real-world case study: Synthetic Leather Football (PU + Foam Composite)
- The Problem: When cutting white PU leather laminated over a soft foam backing right-side up, the heavy resin smoke from the dense top PU layer gets driven downward, staining the pristine white foam layer a dirty charcoal-grey.
- The Flip Fix: Turn the sheet over so the foam faces up and the PU faces down. The laser pierces the thin foam layer instantly (generating almost no smoke), then slices through the lower PU layer. The heavy PU smoke is sucked straight down out of the bottom exhaust without ever touching the foam.
- The Trade-off: The melted edge bead on the PU surface will be slightly rougher on the bottom face than on a direct top cut. If your client prioritizes pristine foam whiteness over micro-edge feel, flip-cutting is an instant win.
6. Maintenance: The Hidden Causes of Edge Yellowing
If your parameters, gas assist, and bed selection are dialled in, but your edges are still yellowing, check your optics.
Dirty Lenses: The Thermal Lensing Trap
To achieve a clean cut, the focal lens must compress the laser beam into a pin-sharp spot.
If airborne resin, smoke dust, or oil mist coats the ZnSe (Zinc Selenide) lens surface, that dirt absorbs laser energy. The lens heats up, expanding and distorting its curvature—a phenomenon known as thermal lensing.
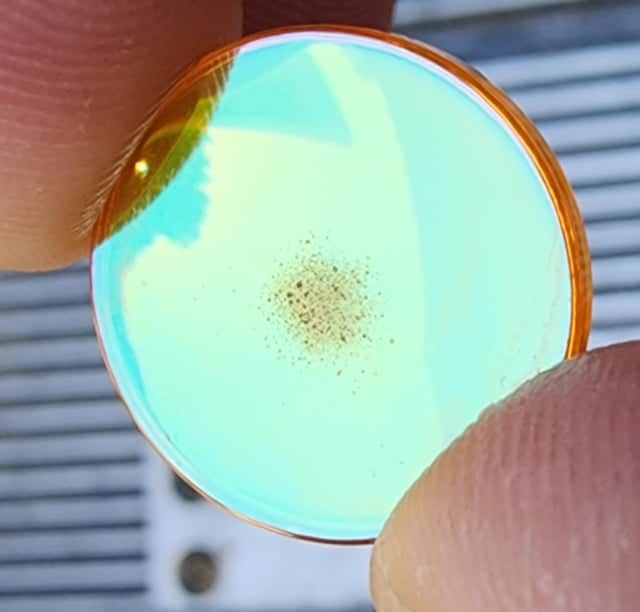
Figure 12: Severe resin contamination and thermal burn damage on a ZnSe focusing lens. (Case source: Reddit r/lasercutting community)
Instead of a tight, intense focal point, the beam bloats into a blurry, scattered spot. Penetration power drops, cutting fails, and broad heat radiation bakes the cut line yellow.
Rule: Clean your optical lenses strictly according to your manufacturer’s schedule using optical-grade lens wipes and high-purity isopropyl alcohol/acetone. A clean lens is the non-negotiable baseline of zero-char cutting.
Compressed Air Moisture: The Silent Killer
If your shop runs a standard air compressor without a dedicated air dryer, high-pressure air entering the cold nozzle expands rapidly, causing moisture to condense into micro-droplets on the lens.
In summer, if your water chiller temperature is set far below ambient room dew point, moisture will condense on the outer lens barrel just like a cold soda can on a humid day.
This water film scatters the laser beam, destroying focus quality and causing immediate edge discoloration.
Fix: Install an industrial refrigerated air dryer and inline moisture filters behind your compressor, and keep your chiller water temperature set within 2–3°C of ambient room temperature to prevent condensation.
7. Starting Parameter Guidelines for White Fabrics
Disclaimer: The parameters below represent initial testing baselines for a typical 40W–60W CO₂ laser cutter equipped with a 2.0-inch lens. If you operate a 150W or 300W machine, scale power down percentage-wise and scale speed up accordingly. Always run a power sweep grid on scrap stock before launching a production run.
White Cotton / Linen / Natural Silk
- Behavior: No melting point; prone to thermal pyrolysis, carbonization, and flame ignition.
- Power Baseline: 10%–30% (approx. 8W–18W effective output).
- Speed Baseline: 300–800 mm/s.
- Assist Gas: Clean compressed air or Nitrogen (use low pressure on thin silks to prevent fluttering).
- Tip: Natural silk has a narrow processing window; test increments in 1% power steps.
White Polyester / Nylon (Synthetics)
- Behavior: Thermoplastic; melts and vaporizes cleanly, but prone to amber smoke condensation.
- Power Baseline: 25%–35% (Optionally defocus +0.5mm for smoother edge seals).
- Assist Gas: Nitrogen preferred to eliminate oxidation; pair with strong downdraft exhaust.
- Pulse Frequency (RF Tubes): 4,000–6,000 Hz starting range (lower frequency if edge melts into hard beads).
- Tip: Spandex blends decompose differently; lower thermal input is required.
Heavy White Canvas / Denim
- Behavior: Dense weave requiring deep penetration energy; heat traps easily within inner layers.
- Power Baseline: 40%–50%+.
- Speed Baseline: 100–250 mm/s.
- Assist Gas: High-pressure air assist to flush dross out of deep kerfs.
White Natural Leather & Microfiber Synthetics
- Behavior: High protein and oil content; chars dark easily and generates greasy smoke. As one r/Leather user bluntly put it: "leather burns and smells horrendous." The smell does dissipate within a day or two, but ventilation is non-negotiable.
- Speed/Power Baseline: 150–250 mm/s at 35%–45% power.
- Frequency (RF Tubes): 6,000–10,000 Hz.
- Protection: Mask the top face with low-tack painter's tape to catch sticky tar residue.
- ⚠️ Safety: Chrome-tanned leather releases toxic hexavalent chromium compounds when lasered. PVC-based synthetic leather (leatherette) releases corrosive HCl gas. Always verify leather type with a Safety Data Sheet before cutting.
8. Safety Red Line: NEVER Cut PVC Materials
CRITICAL WARNING: Never cut PVC (Polyvinyl Chloride), vinyl, or halogenated synthetic leathers on a laser cutter.
When heated by a laser beam, PVC releases toxic, highly corrosive Hydrogen Chloride (HCl) gas. HCl gas severely burns human respiratory systems and corrodes machine linear rails, electronics, and optical coatings within hours.
If you are unsure of an artificial leather's chemical composition, demand a Safety Data Sheet (SDS) from your material supplier before putting it on the machine bed. Never guess.
Frequently Asked Questions
What type of laser is best for cutting fabric without burning?
A CO₂ laser (wavelength 10.6 μm) is the industry standard for textile cutting. Its wavelength couples efficiently with organic polymers and natural fibers, producing cleaner cuts than diode lasers. Diode lasers are cheaper but typically slower, and tend to char edges more on white fabrics due to different absorption characteristics and longer dwell times.
Can I laser cut satin without visible burn marks?
Satin is a weave structure, not a material — it can be polyester, silk, or cotton. Polyester satin responds well to CO₂ laser cutting with proper speed/power settings and air assist. Very thin stretch satin on light colors will show even minor thermal damage. Use minimum power, maximum speed, and consider nitrogen assist for critical white satin work.
Why does my laser cut fine on dark fabric but leave marks on white?
White fabric absorbs CO₂ laser infrared (10.6 μm) just as well as dark fabric — color doesn't affect absorption at this wavelength. The difference is that thermal damage invisible on dark materials becomes glaringly obvious on white. The physics are the same; the tolerance for imperfection is simply zero.
Does laser cutting seal the edges of fabric?
For synthetics (polyester, nylon), yes — the laser melts and fuses the cut edge, creating a seal that resists fraying. For natural fibers (cotton, silk), no — they carbonize instead of melting. See the detailed breakdown in Section 1.
Can I stack multiple layers of fabric for faster laser cutting?
Not recommended. Stacking traps heat between layers, increasing fire risk. Lower layers often char or fuse together before the top layer finishes cutting. Single-layer automated roll feeding is both faster and safer for production.
Is laser cutting leather safe?
Vegetable-tanned leather can be laser cut with proper ventilation. The burnt smell typically fades within a day or two. Chrome-tanned leather releases toxic fumes, and PVC-based synthetic leather releases corrosive hydrogen chloride gas. Always check the material Safety Data Sheet.
What is the difference between CO₂ and diode lasers for fabric cutting?
CO₂ lasers produce fast, clean cuts on organics with minimal charring when properly tuned. Diode lasers are cheaper and lower-maintenance but cut more slowly and typically produce more edge discoloration on white materials. For production-grade textile cutting, CO₂ is the standard.
Summary
Preventing yellow burn marks on white fabric isn't about finding a single secret setting—it’s a multi-layered engineering process:
- Understand your material: Control heat input for natural fibers; manage vapor exhaust for synthetics.
- Optimize motion & power: Run high speeds and minimum power; choose Galvo for micro-intricate details and Gantry for large roll cutting.
- Protect the optical path: Maintain a clean TEM00 beam mode, clean lenses regularly, and prevent moisture condensation.
- Manage air & bed physics: Combine coaxial nitrogen/air assist with strong downdraft exhaust; use slat beds to eliminate backside flashback.
Every safeguard matters. Skip one link in the chain, and white fabric will remind you with a stubborn yellow edge.
Test your materials, respect the physics, and keep your cut edges pristine.