 Skip to content
CO₂ Laser Cutting: Why Parameter Tables Fail
Quick Takeaways
- Parameter tables are starting points, not guarantees — Even same-wattage machines perform differently
- 4 factors matter more than wattage — Optics, assist gas, motion system, and material variability
- Always test on scrap first — Before production runs, validate parameters on sample material
- Build your own parameter library — Record settings that work for your specific machine and materials
Why Parameter Tables Fail
Last year, a sign shop owner came to me frustrated. "I bought two identical laser machines, used the same parameter table on both. One cuts beautifully, the other keeps burning edges."
I inspected both machines. Same power, same brand, same settings. The issue wasn’t the hardware. It was how he thought about parameter tables.
Your laser might be 25W or 150W. Either way, those numbers on manufacturer tables are starting points. Not answers. This guide covers why you can’t just copy parameters from one machine to another, and how to build a cutting library that actually works for your specific setup.
The Temptation and Trap of Parameter Tables
Parameter tables feel comforting. They take a messy, multi-variable process and turn it into a simple lookup: find your material, check the thickness, set the speed. Done.
But vendors rarely label their tables honestly. They don’t say "these are starting points" or "your mileage may vary." So people treat them like recipes. Two bad ideas come from this:
-
Testing is optional once you have the table. And any 60W laser can use the same 60W numbers. Both are wrong.
-
A typical table lists materials — acrylic, MDF, wood, leather, PVC, paper, and so on — with thicknesses and settings from 25W up to 260W. It gives you "Max" and "Optimal" speeds in mm/s.
That’s useful if you’re using the exact machine the vendor tested on. Copy it to a different brand? You’re asking for trouble.
Why same wattage doesn’t mean same results
Think about cars. Two vehicles can both have 2.0L engines and still get completely different mileage, acceleration, and handling. Same idea with CO₂ lasers. The number on the tube doesn’t tell you what it can actually cut.
Here’s what actually matters:
-
Laser source and beam quality. Glass-tube and RF-excited lasers with the same wattage rating can perform very differently. A good single-mode beam puts more effective energy on the material than a sloppy multimode beam, even at the same power.
-
Power derating. Most practical recipes run at 50-80% power to extend tube life. But "100W at 60%" on one controller isn’t the same as the same setting on another brand.
-
Optical losses. Mirror quality, lens condition, and alignment all steal power before it hits your material. Two 100W machines can deliver very different energy at the cut if one has dirty or misaligned optics.
Copying "100W + 10 mm/s on 3mm acrylic" from a vendor table is as risky as assuming every 2.0L car has the same 0-100 km/h time.
The 4 Factors That Drive Cutting Performance
Beyond nominal wattage, several interacting subsystems determine which power–speed combination will cut cleanly:
| 🔍OPTICS | 💨 GAS | ⚙️ MOTION | 📦 MATERIAL |
|---|---|---|---|
| • Focal length | • Gas type | • Gantry rigidity | • Density |
| • Focus position | • Pressure | • Acceleration | • Moisture |
| • Spot size | • Nozzle design | • Controller tuning | • Batch variation |
| • Stand-off distance | • Supplier differences |

1. Optics: Lens, Focus Distance, and Spot Size
Lens focal length and focus position directly control spot size and depth of focus:
| Focal Length | Best For | Characteristics |
|---|---|---|
| 50mm | Thin materials, fine details | Smaller spot, higher intensity |
| 100mm+ | Thick plates, metals | Longer focus region, deeper penetration |
Focus Position Matters:
- Surface focus: Best for thin materials
- Mid-thickness focus: Better for thick plates to balance top and bottom quality
💡 Notes: Long-focus lenses (>100mm) are recommended for knives and thick materials.
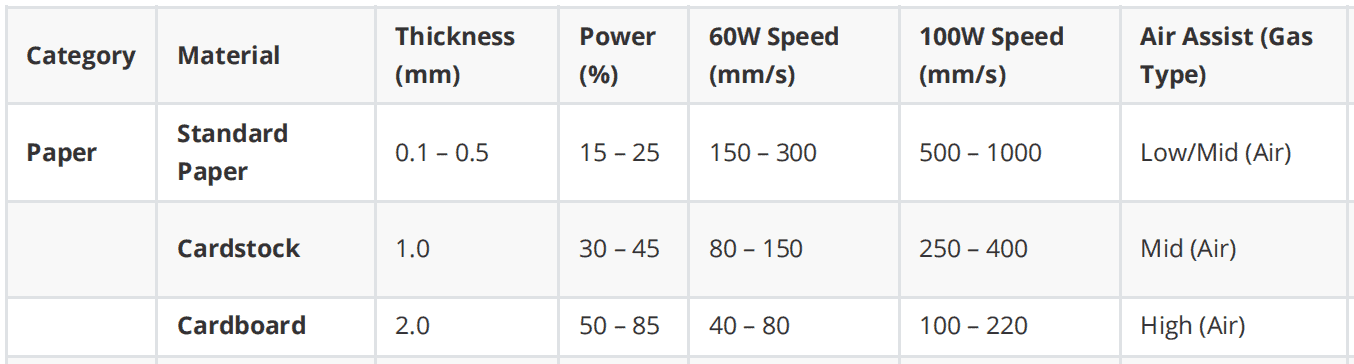
2. Assist Gas Type, Pressure, and Nozzle Design
Assist gas blows molten material and smoke out of the kerf. Its type and pressure have a large impact on cutting speed, edge oxidation, and dross.
Material-Specific Gas Requirements:
| Material | Gas Requirements | Notes |
|---|---|---|
| Acrylic | Low airflow or side blow | Prevent surface roughness; airflow on bottom to prevent fire |
| Knives | High airflow, small nozzle | Greater force per unit area; use >100mm focal length |
| Leather | Small compressor | Use 50mm focal length lens with 60-100W tube |
| PVC | Controlled airflow | Use 50mm lens, 60-100W tube, 50-70% power |
| Paper | Adjust by power | Higher tube power = lower laser percentage |
Key Gas Parameters:
- Gas type (air, oxygen, nitrogen)
- Pressure at the nozzle
- Nozzle orifice diameter
- Nozzle stand-off distance
3. Motion System and Machine Mechanics
Speed values in parameter tables assume a certain level of mechanical rigidity, acceleration capability, and controller tuning.
Desktop vs Industrial Gantries:
- Light-duty desktop CO₂ gantries: High speeds can cause vibration, overshoot, or inconsistent kerf widths
- Heavy industrial gantries: Handle high speeds without issue
Controller Profiles: Many controllers impose different acceleration and jerk profiles depending on whether motion is in straight lines, curves, or small details. "20 mm/s" on one machine may produce different effective speeds on complex paths.
4. Material Variability
Real materials are not perfectly uniform across suppliers and batches:
MDF and Fiberboards:
- Vary in density, binder type, and moisture content
- Significantly change required cutting energy
- Risk of charring or flaming varies by batch
Acrylic:
- Cast vs extruded forms have different thermal behavior
- Edge quality differs at same parameter settings
Natural Materials:
- Leather, wood, fabrics inherently vary in thickness
- Fiber orientation affects cutting
- Finish and treatment differences
Three misconceptions that get people in trouble

- "If there’s a table, I don’t need to test"
People treat vendor tables like recipes. When the cut fails or edges burn, they blame the machine. They miss that their local conditions are different from what the table assumed.
- "All machines with the same wattage use the same settings"
Two 100W machines can need very different speeds and power settings depending on laser source, optics condition, and gas system.
- "More power and speed is always better"
Cranking up power leads to burned edges, wide kerfs, and ugly cuts. Many materials actually cut better with lower power, moderate speed, or multiple passes. Especially when you care about how the edge looks.
One thing to notice: the "Optimal" speed is usually a lot slower than the "Max" speed. There’s a reason for that.
How to use parameter tables without breaking things
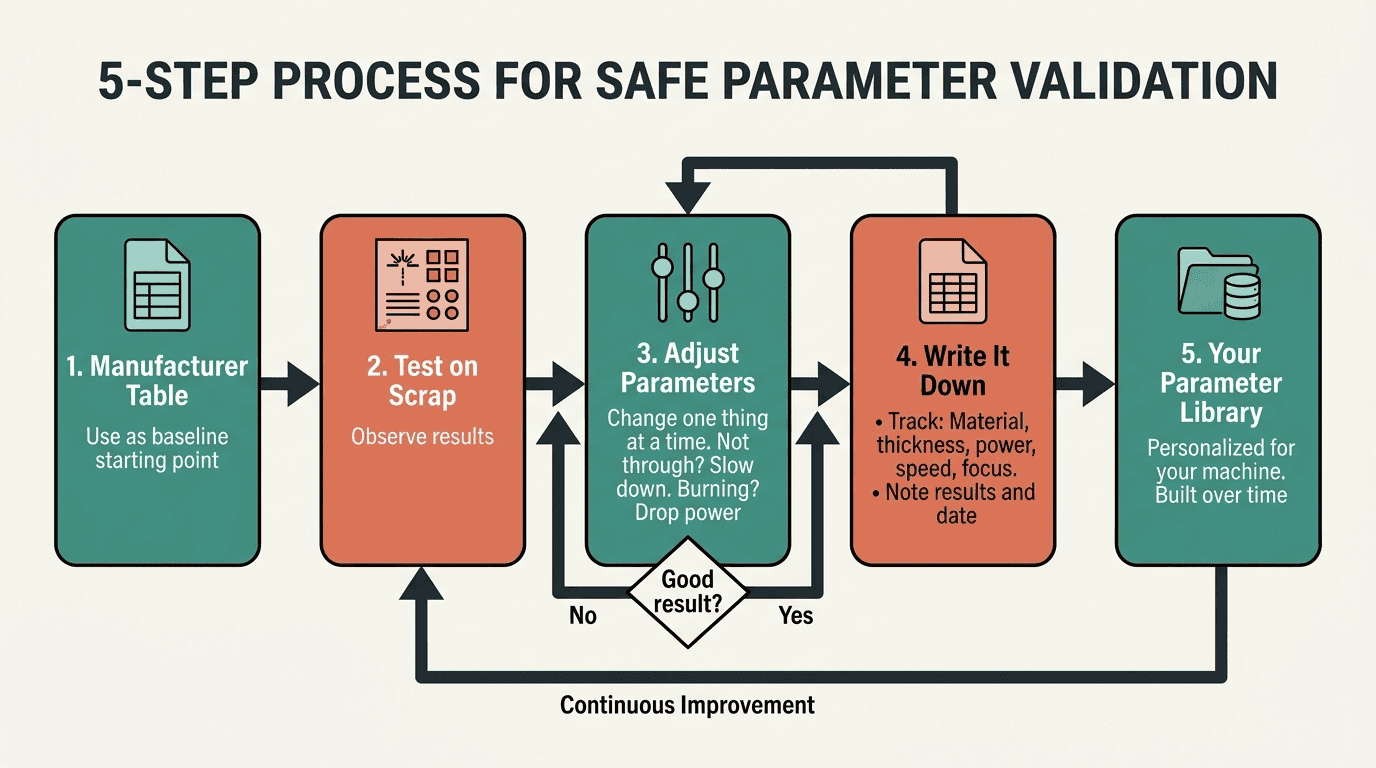
For small shops without much laser experience, here’s a process that works:
-
Start from "Optimal," not "Max." Optimal speeds give you clean cuts with some margin for error. Max speed leaves you no room for machine variation.
-
Do controlled test cuts. Use scrap material. Cut straight lines, squares, and circles. See how the machine handles each.
-
Adjust in small steps. Not cutting through? Slow down gradually. Burning the edges? Drop the power or speed up.
-
Change one thing at a time. If you adjust speed, power, focus, and gas all at once, you’ll never know what fixed the problem.
-
Write it down. Turn the vendor table into your own library. Track what works on your specific machine with your specific setup. A simple spreadsheet works: material, thickness, power, speed, focus, result, date.
Sample Laser Cut & Calibration Log
*This log assumes a 100W CO2 laser starting point using "Optimal" speed data.
| Date | Material | Thickness | Power (%) | Speed (mm/s) | Focus/Lens | Test Shape | Result/Observation | Adjustments Made |
|---|---|---|---|---|---|---|---|---|
| 2026-03-30 | Acrylic | 3mm | 85% | 25 (Opt.) | 63.5mm | 5x5cm Sq | Success. Clean, polished edge. | None – Saved as Master. |
| 2026-03-30 | Plywood | 3mm | 70% | 30 (Opt.) | 63.5mm | Circle | Failed. Did not cut through 10% of path. | Small step: Reduced speed to 25mm/s. |
| 2026-03-30 | Plywood | 3mm | 70% | 25 | 63.5mm | Circle | Success. Full penetration, slight charring. | None – Saved as Master. |
| 2026-03-30 | Cardboard | 2mm | 85% | 220 (Opt.) | 63.5mm | Straight Line | Warning. Edge burning/flare-up. | One change: Increased speed to 240mm/s. |
| 2026-03-31 | Acrylic | 10mm | 95% | 5 (Opt.) | 101.6mm | 5x5cm Sq | Success. Vertical edge maintained. | Note: Used 4" lens for thickness. |
| 2026-03-31 | Leather | 2mm | 50% | 15 (Opt.) | 63.5mm | Square | Minor Issue. Heavy odor; smoke on surface. | One change: Increased Air Assist pressure. |
Safety basics
Lasers cut with intense heat. Don’t walk away while the machine is running, especially with flammable materials like acrylic, MDF, wood, or paper. Keep a fire extinguisher nearby.
You need proper exhaust ventilation. Some materials are particularly nasty. PVC and vinyl release chlorine gas. Never cut these without specialized filtration. Acrylic fumes irritate lungs. MDF and resin materials can release formaldehyde.
Don’t look at the beam. Use the viewing window. Keep your hands away from the cutting area.
Know what you’re cutting. Unknown plastics might contain PVC. Painted materials can release toxic fumes. Pressure-treated wood has chemicals you don’t want to vaporize. Check the safety data sheet (MSDS) or test a tiny sample with extremecaution if you’re unsure.
What rigorous validation actually looks like
If you want to be thorough about it:
Pick a few representative materials and thicknesses. Test around each "Optimal" speed: try 30% slower, 15% slower, the listed speed, 15% faster, 30% faster. Keep everything else the same.
Grade each test on: does it cut through, how clean is the edge, how wide is the kerf, any dross, any flaming, and can you repeat it.
- Cut-through reliability
- Edge quality
- Kerf width
- Dross formation
- Flaming risk
- Repeatability
This tells you whether the suggested settings sit in a safe zone or right on the edge of failure.
Free Download: Parameter Tuning Checklist
Get our step-by-step checklist for validating and optimizing your laser cutting parameters. Perfect for beginners and shop owners building their parameter library.
Includes:
- ✅ Pre-cut inspection checklist
- ✅ Test cut procedure
- ✅ Parameter adjustment flowchart
- ✅ Results tracking template
Frequently Asked Questions
No. Even same-wattage machines differ in beam quality, optics, and mechanics. Use tables as starting points, not guarantees. Always test on scrap material first.
This is typically a focus position issue. Try:
- Focusing at mid-thickness instead of surface
- Checking lens cleanliness
- Verifying airflow isn’t blowing out the beam path
- Ensuring material is flat and level
- Max: Fastest speed that technically cuts through (may sacrifice quality)
- Optimal: Balances speed with edge quality and process stability
Beginners should always start with Optimal speeds and validate before attempting Max speeds.
Yes. According to our parameter testing:
- Iron plate: Requires oxygen assistance at 0.8MPa pressure
- Stainless steel: Can use nitrogen for oxide-free edges
- Acrylic/Leather: Require controlled airflow (not high pressure)
Different materials have different gas requirements for best results.
Follow this process:
- Start with manufacturer tables as baseline
- Test systematically on scrap material
- Adjust one parameter at a time
- Record all settings and results
- Build a spreadsheet organized by material and thickness
- Update as you gain experience with different batches
Over time, you’ll have settings optimized for your specific machine and suppliers.
About the Author
Yuen is a laser applications engineer at RedShift with 8 years of experience helping workshops optimize their cutting processes.
Have questions about your specific setup? Get in touch →
Related Articles
📞 Need Help Optimizing Your Laser Parameters?
Schedule a free 15-minute technical consultation with our applications team. We’ll review your setup and provide personalized recommendations.
Book Your Free Consultation → WhatsApp +86 167 2728 6207
Last updated: March 27, 2025


One Response